RETRO KITCHEN
Dream Kitchen for Less than $1000
For years, Karyn has wanted to upgrade her kitchen. The status quo came with her house, and included bottom-of-the-line cabinets in 1970s earth tones. I am virtually certain that 20 years from now, this article will be cited as a classic example of baby-boomer Philistinism, recklessly and wantonly destroying a mint condition 1970s tract home kitchen in "priceless faux walnut and Harvest Gold."
At present, I am quite willing to accept the razzberries of future Gen-X remodelers, because our goal was to recreate the red-and white tract home kitchen of the early 1950s, as illustrated in the following ads from the period:
Ad from the Formica Corporation
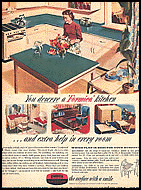
Youngstown Kitchen Co, 1951
Note the little half-round shelves
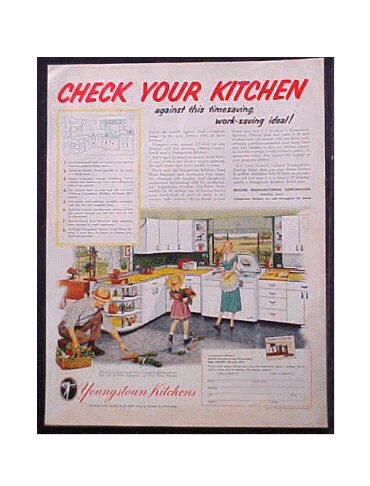
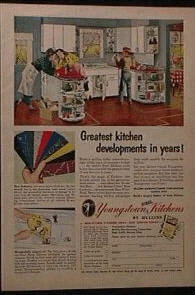
Youngstown Kitchen Co, 1952
HotPoint Future Kitchen, 1944
"You'll have to wait until the war is over..."
From The Saturday Evening Post, December 9, 1944
Although we have long viewed thes dream kitchens of the past with fond regard, there always seened to be some barrier which kept us from following up on plans to remodel. We were jump-started into action when one of our wonderful readers sent us an e-mail, offering to give us half of a real diner booth, provided that we get it out of his small basement. As Providence seems to smile on these undertakings, we found the EXACT correct table at a Salvation Army store, correct down to the chrome trim, and "Boomerang" laminate pattern. [Note that in the 1950s, this pattern was called "Skylark" and depicted idealized birds, an exultation of larks, if you will.]
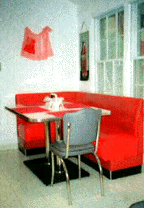
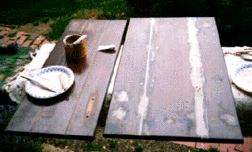
The Booth and Table
The Table constitutes the first actual purchase, and hence the beginning of the project in January of 2002. We got the table and four chairs for $200, waiting carefully for the percentage reductions available at the Salvation Army (anything on the floor for more than a month is reduced by one half). We did some pricing of Formica (Check out Back in Time) , and found that actual, new-old-stock plastic laminate in this pattern goes for something like $300 a sheet --- without adding the molding (at $5 a foot) or the table body or the chairs. This, I believe was the most economical way of acquiring a table for the booth.
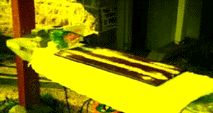
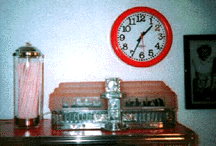
At the same time the table appeared, we found an etagiere at a website closeout sale for $99 -- this item advanced the formica and chrome theme, and was well below the materials cost of duplication
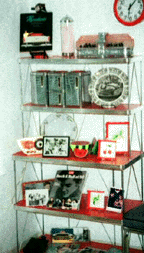
The etagiere
Beginning with these starters and inspirational photos, we set out to use skill, creativity, and massive dumpster diving to bring the rest of the kitchen back to the 1950s.
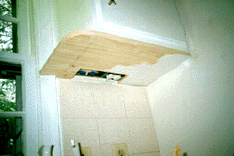
The following photos indicate just how much work lie ahead of us
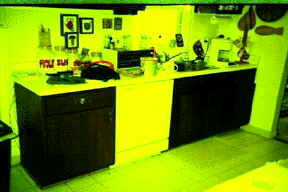
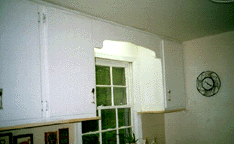
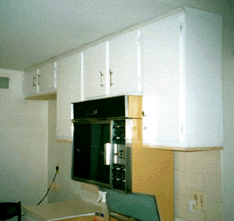
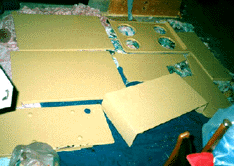
Bottom cabinets
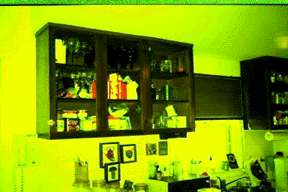
Top Cabinets (Doors Removed)
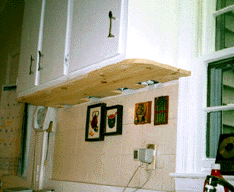
The project began with complete refinishing of the doors and frames. For some reason, the 1970s designer of these cabinets had attempted to simulate colonial style with fake wrought iron hardware and grooves in the doors to simulate panel joints. The cabinets were made of some strange wood that was just slightly harder than balsa. These things had the flimsiest frames that I have ever seen. Our job was (a)get rid of the hardware and grooves; (b) strengthen the frames; and (c) paint everything gloss white .
In addition, the top cabinets were not unified into a continuous whole; in the 1950s, a valence and indirect lighting were part of the design, and had to be incorporated into the project.
Filling the grooves and scratches with
Min Wax Epoxy Putty
Sanding and smoothing the doors
One simply can't use standard wood filler to repair the doors; the cabinets flex and take a pounding. For this purpose, we used Min Wax epoxy filler. This is a two-part mixture that sets up quickly and cures with in a day. After curing, it can be worked like wood, including sanding, drilling, painting, etc. It lasts forever. We used two cans of this product at $7.50 each

Valence and Indirect Lighting
This kind of valence is iconic of the 1950s. This one has a $9.95 fluorescent fixture behind it. We had to do some additional wiring to bring power to the light.
Beefing up the Cabinet Bottoms
The cabinet frames were, in a word, flimsy; we strengthened them considerably with a new wood product, a lamination of small strips that actually looks like a straight grain board. The product works just like wood and takes a wonderful paint finish. Better yet, a four foot slab, 12 inches wide is only $5 (This would be $25 if it were in #1 grade pine!)
We used this product to cover the bottom of the cabinets, but not until we had installed new electrical outlets and switches for the indirect lighting. Fortunately, we were able to pull wires from existing outlets to serve these needs. These new switches and outlets are shown in the photographs
Also, you can see that we have incoprorated the classic 1950s "half round" shelves into the design.
Indirect Lighting
This photo shows the classic 1950s Valence with fluorescent indirect lighting.

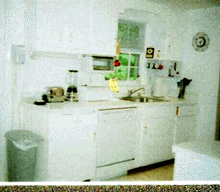
Opposite Wall
More Beefing Up
Note the Harvest Gold stove...and the sickly beige tiles...

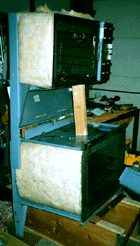
Mounting the Toaster Oven
Everything was cleaned thoroughly with a commercial degreaser. A good quality primer and three coats of premium gloss white enamel were applied to all the wood surfaces.
All door handles were replaced with clever chrome handles that look like forks or spoons ($3.95 each). Drawers got simple chorme "U" shaped pulls ($1.50 each). The total cost for Handles and Pulls was about $71 -- a splurge.
We bought a toaster oven with an under-counter mounting attachment. The item was on sale at $29, and has very nice design characteristics
Coffee Maker Mounting
We also bought a coffee maker with and under counter mount. This is an especially nifty device, but kind of pricy at $44. On the other hand, the kitchen clock with a fork and spoon theme was only $9 at a K-Mart closeout.
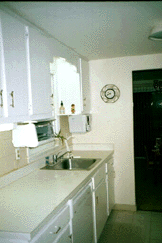
Finished Wall
Next, we had to deal with the wall tiles -- the previous owner had selected a sickly beige color and had done a very bad job of putting the tile together. Our solution was to use a bathroom reporcelainizing kit. (Klenk Industries, $30 at Home Depot). This is an epoxy preparation that bonds to porcelain surfaces and fills in small gaps. The process takes a long time, invoving cleaning, sanding, acid etch, and neutralization. In addition, the surface must air-dry for at least 24 hours after neutralizing the acid etch to prevent minute amounts of water from causing "fisheye" blemishes in the finish. The product gives off significant fumes and requires a full-strength respirator to apply; two coats are suggested with a 60 minute gap between coats. The product must cure for three full days.
Even though it was a stinky mess, we were very satisfied with the reporcelainization --- especially since it would have cost over $400 to replace the tile!
The Stove was a disgusting Harvest Gold color, but it was in very good working order. The first major project was to get several of our muscular friends to move the stove into the garage. We then discovered that nearly 25 years of constant use had built up an incredible amount of grease residue on all the surfaces. It took healthy doses of oven cleaner and citrus-based degreaser to get the surface completely clean.
The Stove in Pieces
The Carcass of the Stove
Everything that was to be painted was carefully cleaned, etched, and cleaned again. Rust-Oleum household appliance epoxy paint was applied to all the surfaces which were not directly heated. The stove top was treated with special high heat powder coating. It took almost three weeks, but we wound up with a gloss white stove as shown below.
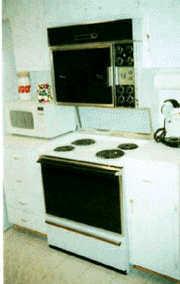
The Finsihed Stove
At the right of the picture, you can see the Sunbeam Model 10 Mixmaster discussed below.
We added some atmospherics, such as a vintage Model 10 Mixmaster ($2 at a yard sale), replica Oster Blender ($70), and a Sunbeam Toaster
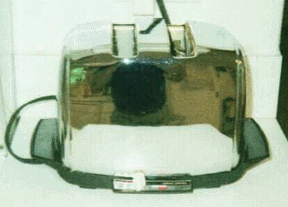
Sunbeam model T-20 automatic toaster
We found this for $4 in Manassas
The Toaster has a beautiful chrome body with incised deco design and bakelite base. It's automatic beyond belief! No levers to push -- no popping or banging. Just drop in the bread and the Sunbeam turns on the current and lowers the bread silently. When perfectly toasted, the current turns off and the toast comes up silently.
With "Radiant Control", the toasting is always the same no matter what kind of bread you use. The heat radiated from the surface of the bread activates the exclusive thermostat. That's why you always get the same uniform golden toast you want whether the slices or moist or dry, cold or warm, thick or thin.

Above, is an ad for the T-20 which appeared in the early 1950s.
These were very popular as wedding gifts when it debuted in 1949. Slots are a little wider than usual. Made in United States America, Sunbeam Corporation, Chicago, U.S.A. Toronto, Canada., 110-120 Volts, 1275 Watts
Below is a very lovely Sunbeam Mixmaster that we found at a yard sale in Bel Air Maryland for only $1. This is a true find!
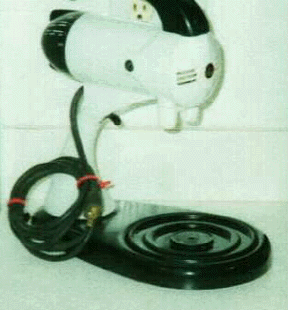
Sunbeam Model 10 Mixmaster
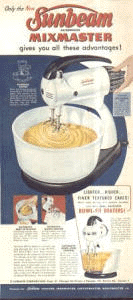
1952 Ad for Sunbeam Model 10 Mixmaster
Here is a little COSCO step stool that was found in a trash pile by Karyn's sister-in-law, Debby. It was dis-assembled, sanded, and sprayed with epoxy enamel. We had some red naugahyde left over from making the cornice. Thus, the total cost was $0. Thanks, Debby!
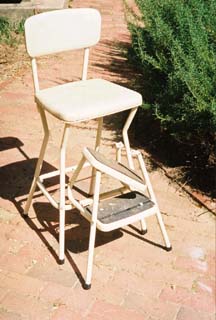
Step Stool, Before
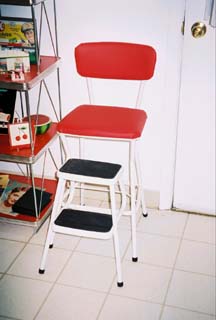
Step Stool, After
Other Stuff
Here are some othe atmospheric additions, including a straw holder and a lamp in the shape of a diner. The lamp came from Zap and Company in Lancaster, Pennsylvania.
During our visit to Zap and Company we came across a marvelous little book, shown below:
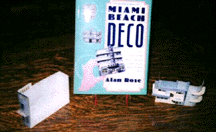
Miami Beach DecoBook
This is an amazing book that contains little punch-out paper replicas of famous buildings in Miami's Art Deco District. This area is almost a square mile completely covered with fabulous buildings in the Tropical Art Deco Style. The complete citation of the book is:
Miami Beach Deco
St Martin's/Griffin
175 Fifth Avenue, NYC 10010
ISBN 0-312-14679-5
1997, $16.95
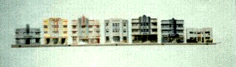
The pictures in the book were so attractive that we decided to use the little models as a decorating focus for the table and booth area.

Compare this with the front of the book
It turns out that you really can make very nice HO Scale buildings that look very realistic! Above, I pose with the model of the Colony Hotel, emulating the photo on the cover of the book
The book lives up to its promise that the buildings are "So easy that an adult can make them!"
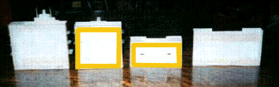
Stiffening
The models look just great as they are made by folding and taping, but to survive years of display, they needed to be stiffened. I bought some balsa wood at a hobby store and built a little framework behind each building. The balsa does not photograph so well, so I have highlighted it in the picture
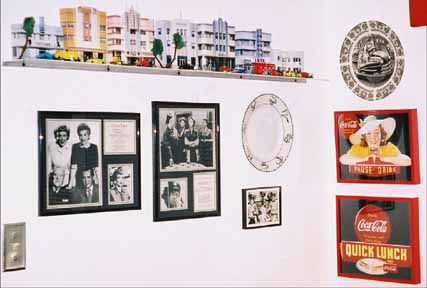
The Display
We were able to buy some lucite plastic that serves as a shelf for the buildings from Piedmont Plastic in Rockville, Maryland. Rummaging through their scrap pile yielded enough materials for a shelf. They sell scrap by the pound, our shelf only cost $3.
We have been adding scale model cars and palm trees to the display as well as posters from the Miami Historic district.
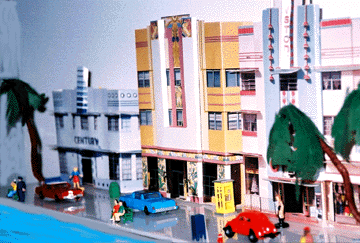
The Display Grows
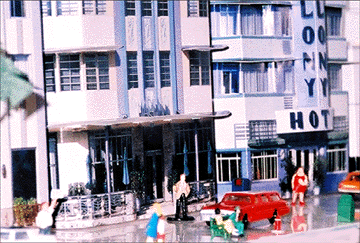
The Display Grows
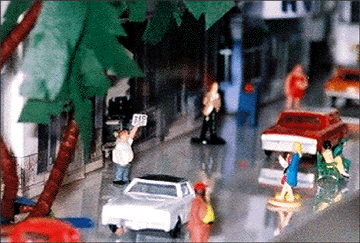
The Display Grows
We have continued to add small, low budget things to the Kitchen as bargains make themselves available to us. As a case in point, we happened to be at a JoAnn's Fabric Store (looking for something completeley different...), we came across a nice bargain remnant of red naugahyde that exactly matched the booth. With the aid of a 10 foot utility grade 1x6 from Home Depot (about $5), we were able to produce a very nice cornice for the window. (We applied Dacron batting to the cornice and then stapled the naugahyde to it. Here's the cornice:
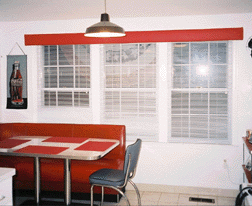
The Cornice
Debra Sternberg gave us a very nice GE fan from the period. Alas, it was green. So, I had to spend some time altering the color just a bit to fit in with the decor. But, I think that everything worked out just fine

Debra Sternberg's Gift Fan
Our next project was to decorate the vast blank space created by the high vaulted ceiling in the breakfast room and the lower space in the kitchen. We entertained a lot of ideas before Karyn bid about $10 on a "lot" of Aprons being auctioned on e-Bay. The package turned out to be a treasure trove of over 30 aprons from the 1950s!. We selected the best and arranged them on the blank space into our "Ballet of the Aprons" They are held in place with small map pins.
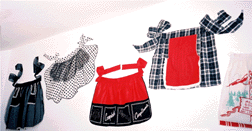
The dancing aprons
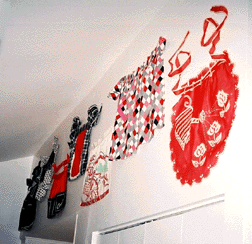
More Dancing Aprons
Karyns son, Justin, gave her this lovely neon clock for a birthday present.
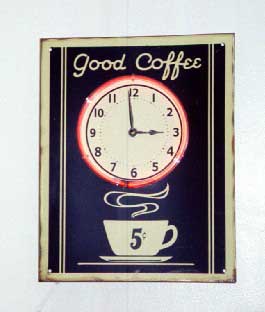
The neon Clock
We received a photo from a reader who actually has more stuff hanging in her kitchen than we do!
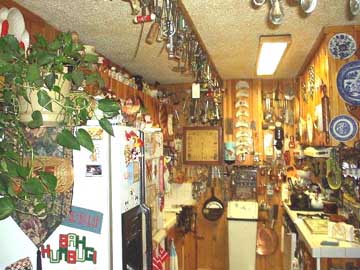
reader Carol's Kitchen
Keep your eyes open -- the best things are just outthere waiting to be found!
The entire project cost about $900, as shown below:
Equipment ----- $577.95
- Table $200.00
- Etagiere $99.00
- Toaster Oven $30.00
- Coffee Maker $44.00
- Clock $9.95
- Toaster $4.00
- Mixmaster $1.00
- Repro Blender $70.00
- Deco Buildings Book $20.00
- Diner lamp $100.00
Supplies and Materials ---- $325.90
- Epoxy Filler $15.00
- Stock for Valence $7.00
- Stock for Cabinet Bottoms $20.00
- Paint $40.00
- Electrical Supplies $30.00
- Fluorescent Fixtures $20.00
- "Spoon/Fork" handles $55.30
- Drawer Handles $15.60
- Reporcelainizing Kit $30.00
- Respirator $25.00
- Stove Coatings $55.00
- Balsa wood $10.00
- Plastic for shelf $3.00
If you want to be a part of the "1950s Kitchen Wave", we suggest that you take a trip to York Pennsylvania to visit Eldon Gladfelter's shop Classic Kitchens and More.
News Flash, April 2005
The National Kitchen and Bath Association recently reported that laminate continues to be the most popular material for kitchen countertops, but it's dropped in popularity. In 1997, 72 percent of remodeled kitchens had laminate tops. In 2002, that figure fell to 50 percent.
But Formica is fighting back.
On May 2, the company will reintroduce two of its original patterns. "Skylark" with idealized birds flying in a blue, aqua, coral or charcoal sky, (first issued in 1950). "VirrVarr," with a spider-webbish design in light blue or white, was created in 1958.
Renee Hytry, the senior vice president of global design at Formica, said that today's public got a glimpse of the company's earliest designs in promotions celebrating Formica's 75th anniversary in 1988. Architects, designers and mid-century enthusiasts kept calling for the older patterns to be re-issued. Focus groups and market testing confirmed consumer interest, Hytry said. The patterns will be available wherever Formica is sold, including kitchen and bath showrooms, Home Depot and Lowe's.
If you found this page informative, you might want to check out reports of some of our other Restoration and Construction Projects
Counter for the Entire Site (not just this page..)
Home | About Lindy | 1940s Collectibles | Upcoming Events | Vintage Clothing
The Guide - Establishments - Travel - Accessories
Music | Links | Photo Gallery | Extras | Contact