
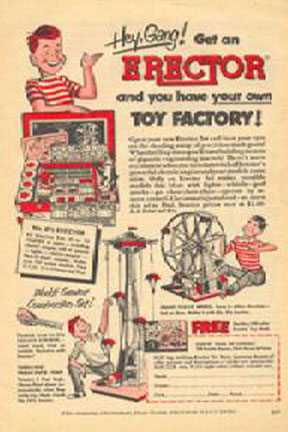
My Experience with Erector Sets
Boys Should be Boys!
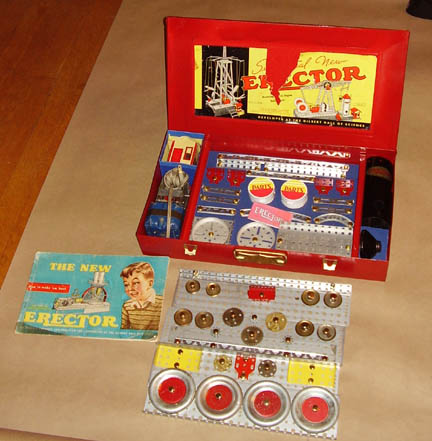
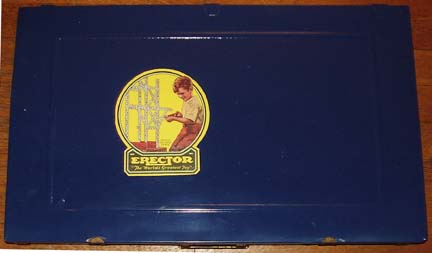
My Erector Sets and Their Restoration
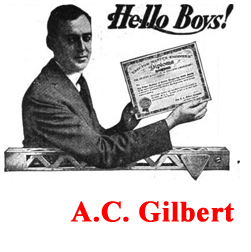
A.C. Gilbert Made Millions by Feeding the Dreams of Young Boys
Do you think they believed that the set would allow them to build something that big?

Join Us on Facebook
After a whole lot of preparation, I have finally finished this page on Erector Sets. This has been one of my continuing interests from childhood through my current senescence. With the complete restoration of the fabled "Number 12 1/2 Walking Giant" set (ca 1949), I now have a complete collection of the metal box Erector sets that were made during my lifetime. So, it's time to share what I have learned with you.
Click on a Box to Go There


Before we move on (and to accomodate folks coming in from Search Engines with a specific purpose), here are links to topics covered on this report
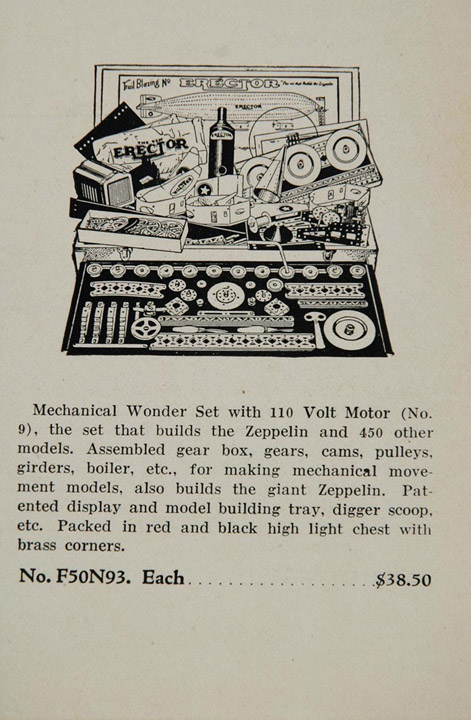
Erector Sets [This Page]- What is this 1/2 Business?
- A Slide Show From the "How-to-Make-em books"
- Pictures of MY Erector Sets
- The Gilbert Sound Kit for Erector Sets
- My Experience in Restoring Erector Sets
- Erector Patents
- Free Download Stuff
- Contact me about something
All About A.C. Gilbert [Separate Page]
- Who was A.C. Gilbert?
- How did A.C. Gilbert sell things to Boys?
- What was Gilbert's Competition like?
- How can I learn more about A.C. Gilbert?
- Rationale for the Erector Set in the 21st Century
- Mr. Gilbert Patents the Vibrator
- Contact me about something
Science Kits [Separate Page]
Brief look at Chemistry, Microscope and other Science Kits
- The Gilbert Chemistry Set
- The Gilbert Atomic Energy Set
- The Gilbert Microscope Set
- The Gilbert Electric Eye Set
- The Gilbert Metal Casting Set
- The Gilbert Air-Kraft Set
- The Gilbert Glass Blowing Set
- The Gilbert Machine Gun
- The Gilbert Optics Set
- The Gilbert Hydraulics Set
- The Gilbert Signalling Set
- The Gilbert Magnetism Set
- The Gilbert Soldering Set
- The Gilbert Erector Brik Sets
- The Gilbert Big Boy Tool Sets
- The Gilbert Elementary Electricity Set
- The Gilbert Lighting Set
- 66 Stunts With an Electric Motor
- Mysto Magic Sets
- Dexterity Puzzles
- Contact me about something
- The Gilbert Atomic Energy Set
The End of the Gilbert Company [Separate Page]
The Last Days of the Gilbert Company
- The Gilbert Chemistry of Plating and Paints Set
- The Gilbert Pottery Set
- The Gilbert Slot Car Set
- Moon McDare Action Figure
- James Bond Action Figure
- Honey West Action Figure
- U.N.C.L.E. Action Figures
- Martian Magic Set
- Model Airlanes
- Gilbert Watches
- Contact me about something
Those with a general interest should just keep scrolling down
The names of the Gilbert Erector sets always included the figure "1/2." At various times, sets ranged from 1 1/2 to 12 1/2.
Sets Were Always Numbered in Half Sizes
This is the "6 1/2"
The "6 1/2" set, pictured above had the largest number of sales and indeed, it is an ideal starter set for an kid about in the 6th grade. It includes an electric motor and enough gears and pulleys to keep a 12 year old busy for along time. Each set roughly corresponded to a grade in school. Kids always want to appear older than they are, and often give their age using the fraction "1/2" (As in, "I am almost old enough to drive -- I'm 15 1/2").
Here is an ad from 1937 that shows the range of sets that were available at that time. To convert to today's dollars, multiply the 1937 price by about 30.
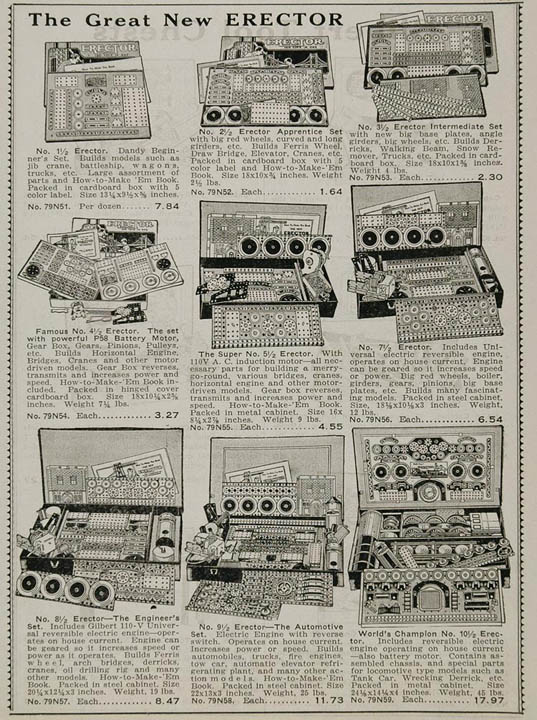
The Range of Sets Available in 1937
Click to enlarge
So, my guess is that the set numbers were assigned to give parents an idea of what is age appropriate. They also made kids want the next model. Of course, there were never enough parts in any of the sets to make the kind of models that kids dreamed about. No problem -- retailers were very glad to sell individual parts. Here is an exceptionally rare dealer parts case from the very early history of the Gilbert Company. These things are now quite valuable!
The Dealer parts Case
Click to enlarge
Over the years, the "5 1/2" and "9 1/2" models went into- and out of- production. The "9 1/2" was only made in the 1940s and comes in a blue metal case. For some reason, Gilbert never made an "11 1/2" set. Sets "1 1/2" through "3 1/2" came in cardboard boxes. Set "4 1/2" was offered in both cardboard and metal. For some other reason, set "5 1/2" only came in cardboard. All the rest came in red metal cases (During the 1930s, there were also green cases).
To summarize: I only collect models in metal cases, which is why I only have 4 1/2 through 12 1/2 with the exception of 5 1/2 (only sold in cardboard box) and 11 1/2 (never made).
There are a variety of specialized sets from the 1920s that made a truck, a zeppelin, and a locomotive. These are really expensive! (Like $1,000- $10,000). Here are some photos of the ultra-rare Zeppelin set that seems to attract the most collector attention:
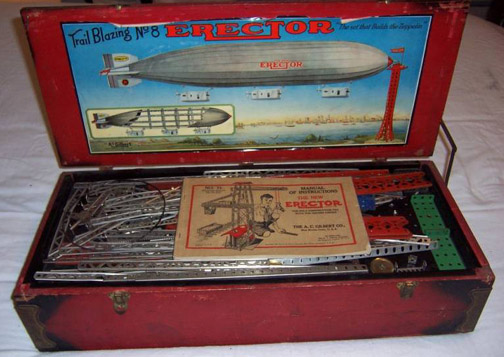
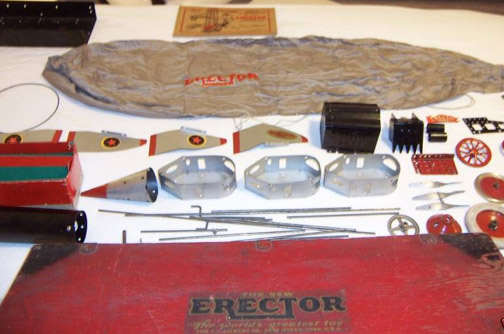
The Famous Erector Zeppelin Set
Click Either Photo to Enlarge It
Advertisement for the Zeppelin Set
Click to enlarge
With its rarity has come a plethora of reproduction and just plain bogus parts. Don't get into a bidding war over these things unless you are absolutely certain about its authenticity. Beware of the set that "just turned up" in a chicken coop on Vermont. The cloth "sock" envelope for the Zeppelin is the rarest part and is widely available in reproduction.
If you want to see more of these exotic sets, meet Bill Bean, who has every erector set ever made. Needless to say, he was the technical advisor for "The Man Who Saved Christmas."
As seen below, My collection is more-or-less run of the mill.

All the Metal Box Sets 1946-1957
No 5 1/2 or 11 1/2.
These are my sets, all restored by me from parts and pieces that I have acquired at yard sales, flea markets, etc. I have supplemented some with parts that I bought through the Internet (competent suppliers listed below). This work has gone on for a period of 15 years. In the 1980s, the boxes were easy to find and parts were cheap. Low numbered sets were sold in great quantity while high numbered sets were sold in much lower amounts. Hence, parts for the 10 1/2 and 12 1/2 are difficult to find. The most difficult item is the DC powered "P-55" motor that was used for the Walking Giant. This is really an American Flyer motor rigged out to work with an Erector Set Gearbox. I will confess that I had to resort to an internet auction to find my "P-55"
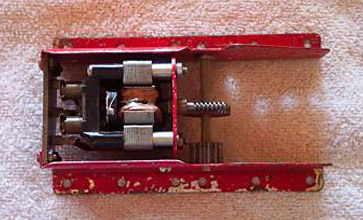
The Elusive P-55 DC Motor
You got a choice AC, DC or Spring-wound.
The 4 1/2 set was the smallest set to come in a metal box. For some reason, the metal box was very desirable, probably because it let boys emulate their Dads or at least those Dads that carried a toolbox. This set offered the rudiments of construction, including powered motion. At this level, kids were only trusted with the spring-wound motor. That's probably a good idea because I still make mistakes and come close to electrocuting myself. (Moms: the spiritual development of the Boy is predicated on taking risks.)
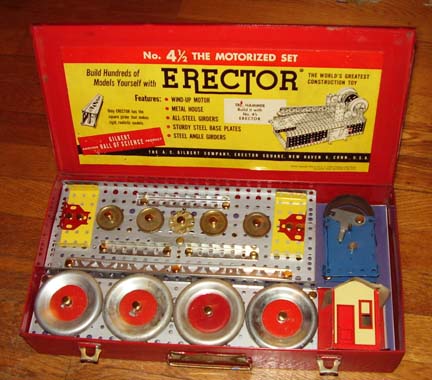
The "Christmas Day" view of the Number 4 1/2 set
Magic, Mystery and Possibility
Above, you will see what the 4 1/2 set looked like when the Boy first opened it, most likely on Christmas Day. The Gilbert folks were very careful to manage tis experience, giving the Boy a glimpse of gears, motors, girders, pulleys and the like, all arrange with perfect symmetry. As you read on, the "Christmas day" look of each set is very important, setting the tone for the set.
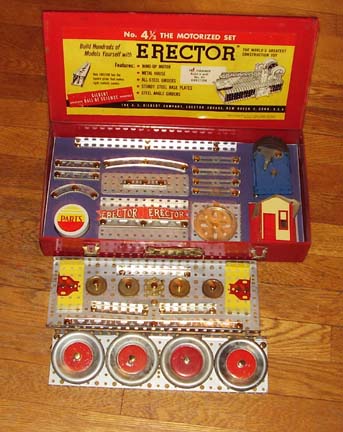
Complete view of the Number 4 1/2 set
Layers of Imagination
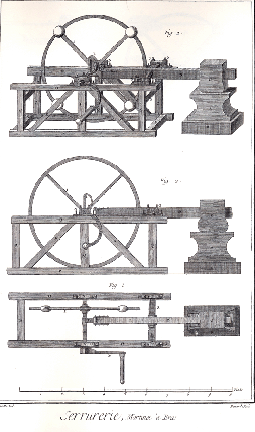
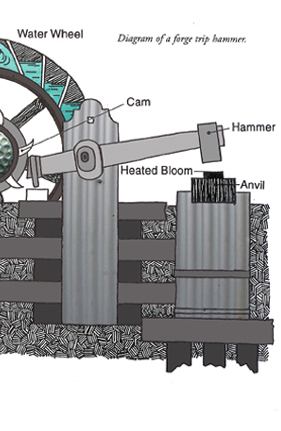
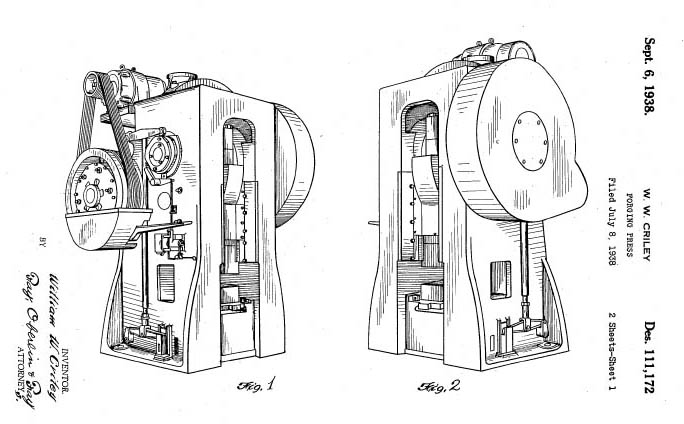
Trip hammers and Their Big Cousin, the Forging Press
Just in case you're not Chinese...
W. Criley Forging Press Design Patent D-111,172
Click Here if you want to learn how to get free patent drawings
That's not quite true -- the trip-hammer would be a complete puzzle to an American boy, but not to a Chinese boy. Did you know that we used to make something besides lawsuits and hamburgers in the USA?
The complete set had parts arranged in layers. The bottom layer was a cardboard tray and parts were held on by "Tee Pins" or "Prong Fasteners". Miscellaneous parts (and duplicates) were wrapped in brown paper and hidden under the cardboard tray. A sheet of waffle-weave cardboard protected each layer. The little "Erector" flag is an important component of each set -- it was used to "finish" many projects. Also included (but not shown) is a hank of blue string that was used for projects requiring pulleys.
There was also the "How to Make 'Em" book that provided the sometimes cryptic instructions for the models. Note the look of wonder and amazement on the little boy's face as he contemplates the possibility of making the Giant Powerplant. Later, he will be somewhat disappointed to learn that this particular Giant model can only be made with the 10 1/2 set.... All Erector models were "Giant" in the sense that the smallest cup of coffee at Starbucks is "Grande".

The "How to Make 'Em" Book"
This was developed at the Gilbert Hall of Science, not some grubby factory!
I have eliminated this insruction book from my photos because it usually covers the top layer.
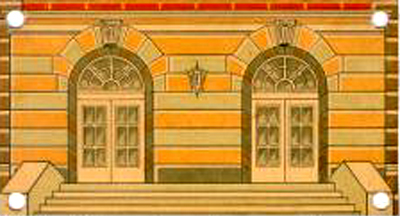
For a very brief (1935-1937), Mr. Gilbert offered Boys something to cover up their steel structures. These are the Skyscraper Panels that were attached to the girders with "Snap Rivets". In 1935, these panels were included with the 4 1/2 set, but in 1936 and 1937, one had to buy a special add-on kit.
If you have ever played with Erector sets, you know that you never have enough parts...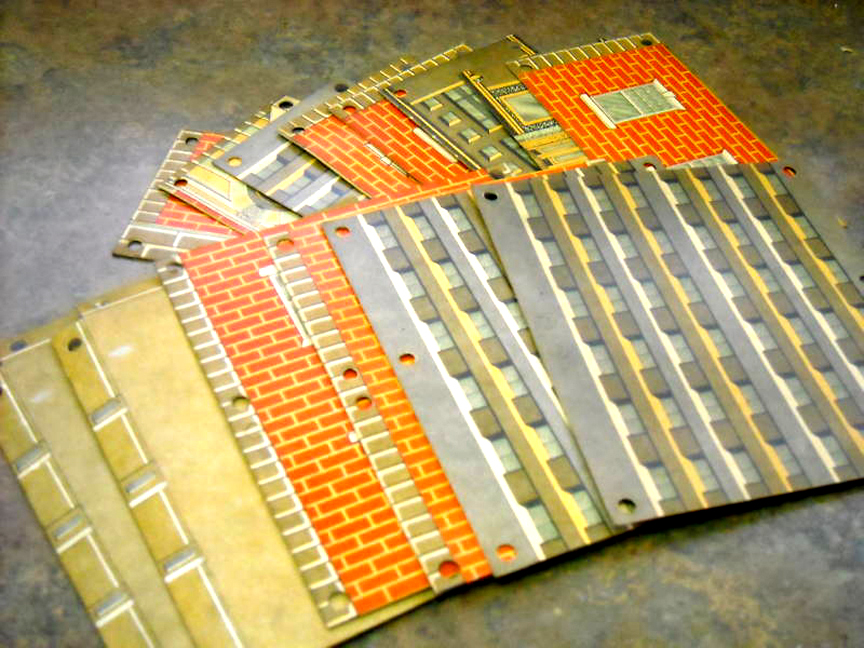
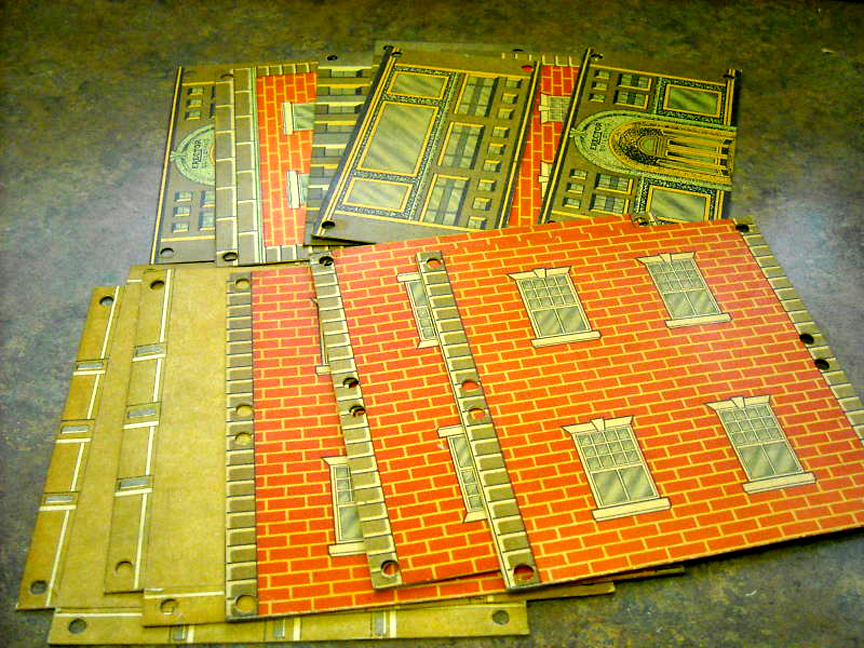
The Skyscraper Panels
(middle) Using and Extracting the Snap Rivets
Click to Enlarge It
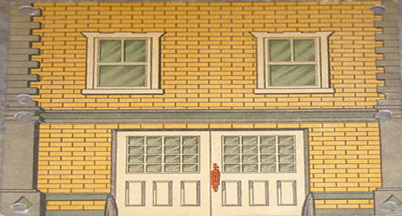
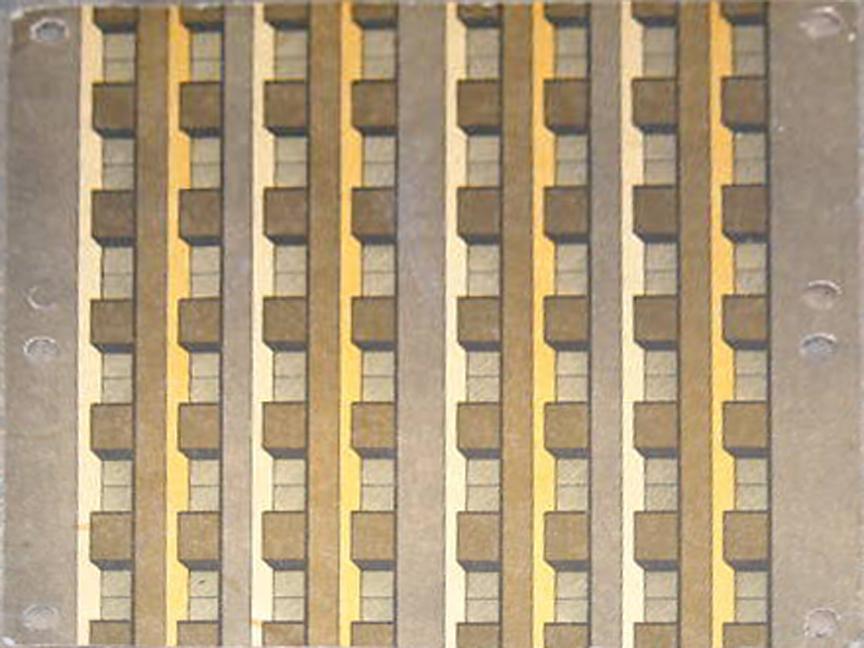
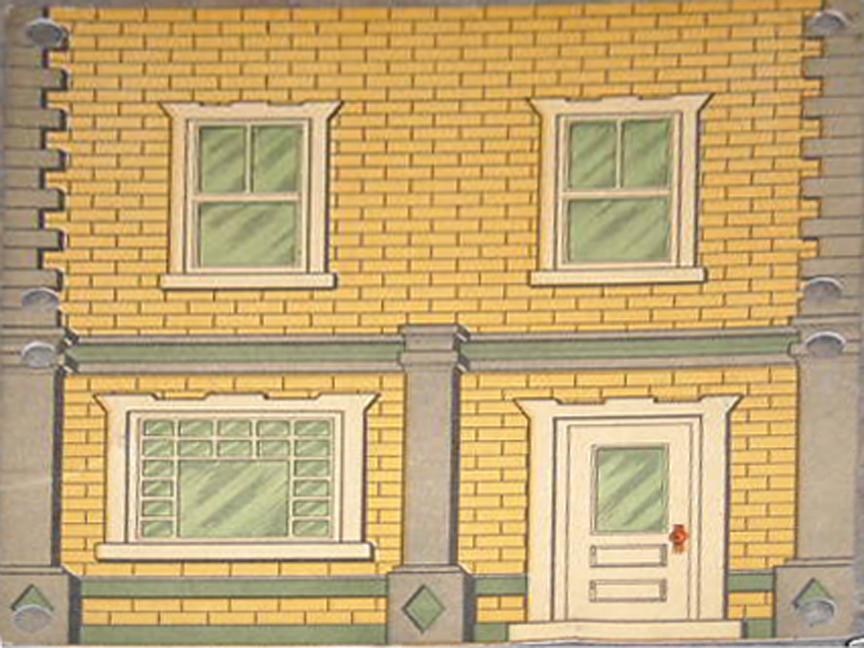
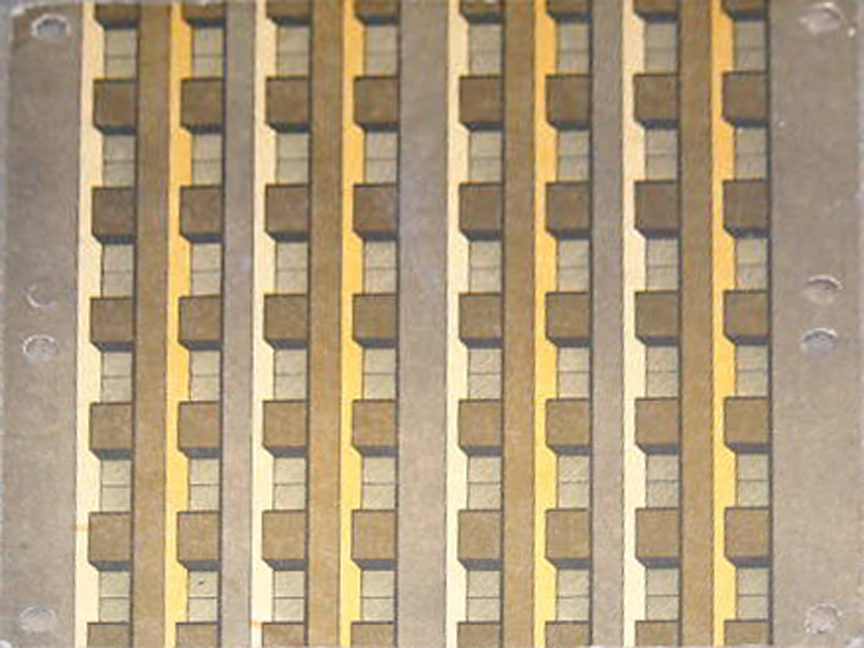
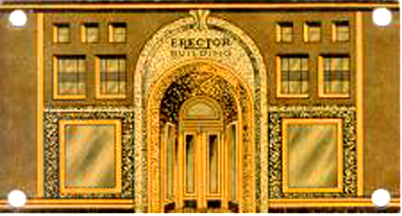
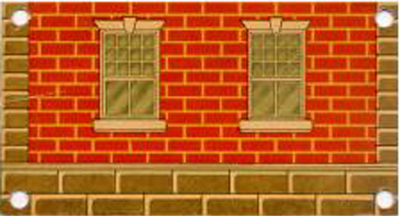
There were seven different panels, lettered "NA" through "NG". They were printed on both sides -- one side showed brick construction while the other showed concrete and steel construction. By mixing and matching ground floor parts with upper story parts, it was possible to create a large number of buildings, provided you had enough parts.
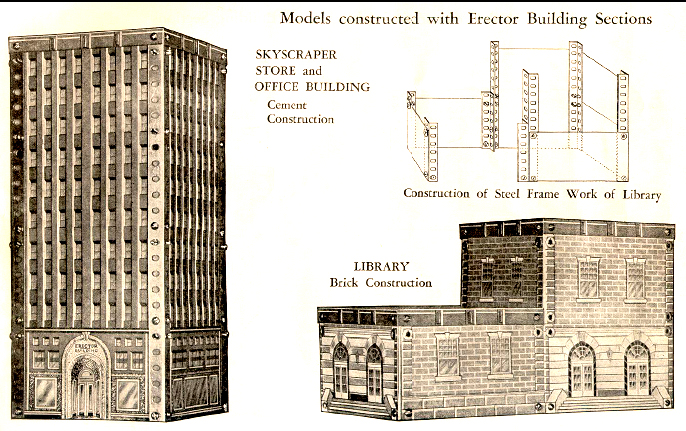
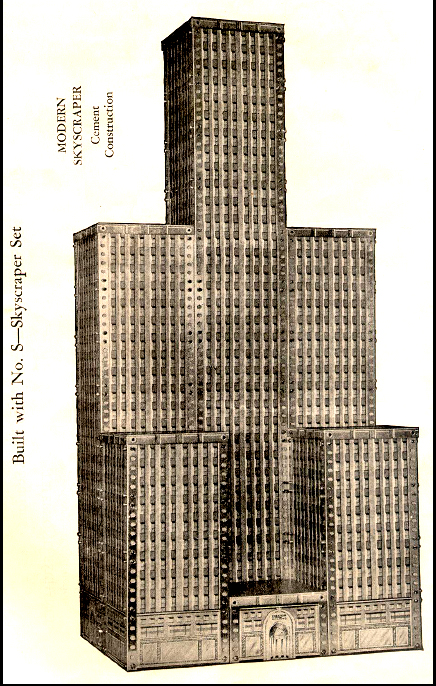
Projects That can Be Built With the Skyscraper Panels
The project on the right requires about 10 times the number of parts that came with the 4 1/2/set..
Click to Enlarge
You may find an excellent summary of the Skyscraper Panels at Girders and Gears that shows all the panels except "NE" and "NF" -- in order to correct this, here are photos of those panels:
The Skyscraper Panels - Part "NE" (Garage Entrance)
The Skyscraper Panels - Part "NF" (Office Entrance)
Click to Enlarge It
The Skyscraper panels are made of stiff cardboard and are therefore quite rare. Keep your eye out for them. The Rivet Extraction Tool is also quite desirable. If you don't want to wait for these things to show up in the marketplace, there is nothing to prevent you from making your own... here are some full size pictures that you can download, paste onto illustration board and use for the time being. You can buy reasonable facsimiles of the snap rivets at a hardware store, and an ordinary tack puller will serve as an extraction tool.
Part NB (Front) Part NB (Back )
Part NC (Front) Part NC (Back )
Part ND (Front) Part ND (Back )
Part NE (Front) Part NF (Back )
Part NG (Roof)
Download the Manual for the Skyscraper Panels
If you use enough illustration board, you can make the Big Skyscraper!
The "Christmas Day" view of the Number 6 1/2 set
Even More Magic, Mystery and Possibility
The 6 1/2 set began the inclusion of an electric motor and was known as the "All Electric" set in the sense that you didn't get the spring-wound motor. The label in the inside of the box-top gave the boy a picture of the most complicated project that could be built with the set. In this case, it is an amusement park airplane ride. This was no mean feat because the boy had to change the direction of motion from vertical to horizontal using beveled gears. This set begins to challenge the owner in the same way as the real world of engineering.
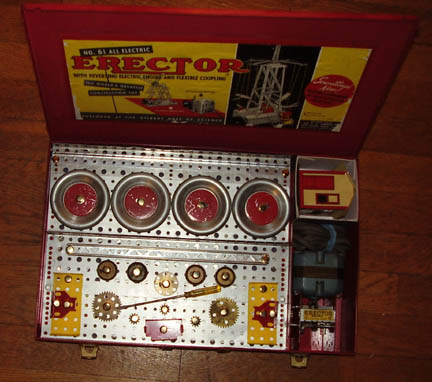
Top Layer of the Number 6 1/2 set
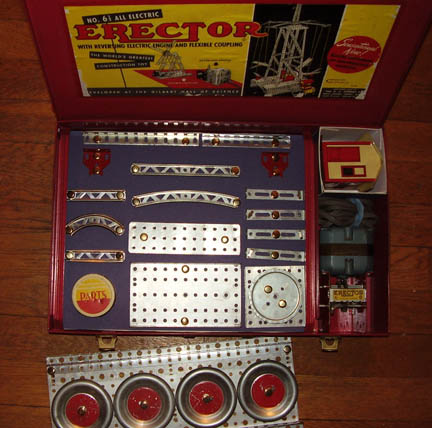
Bottom Layer of the Number 6 1/2 set
The screwdriver set you apart
Apart from the electric motor, the other feature of interest was the yellow-plastic handled screwdriver (Part "NZ"), shown in the bottom layer. The models befor 6 1/2 used a cheap screwriver fashioned out of metal rod. The 6 1/2 screwdriver was professional, just like many real engineers carried. This became a talisman for the boy who wanted to show his peers that he had moved up to the "All-Electric Set." People still value these so much that they have even re-cast the handles to restore them with full accuracy.
Upon comment from a reader, my screwdriver may be "not authentic" because it is longer and narrower than the drivers shown in the restoration tutorial (above). I am now looking into the question, but for the moment, I would use the photos in the tutorial to identify a correct "NZ" screwdriver.
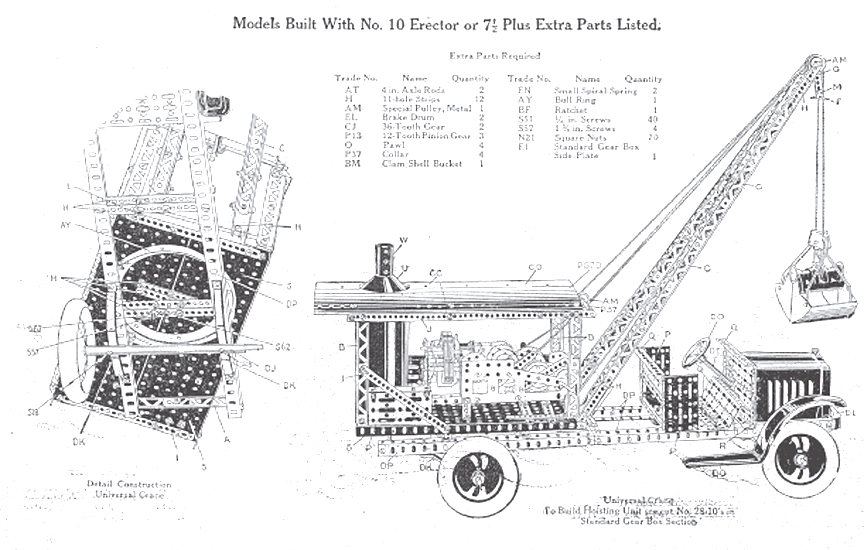
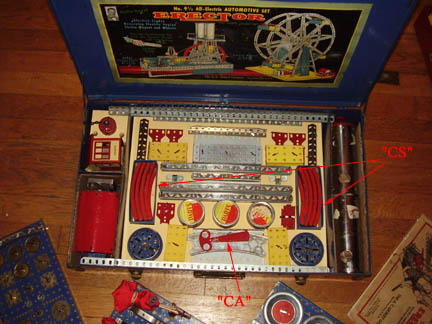
Here are some photos of my 7 1/2 set from the 1950s -- as you'll see below, the 7 1/2 set has a distinguished heritage from the 1920s.
The 1950s Set
The 7 1/2 set is the first to have "rails" that divide the space into three segments. The LEFT holds the A-47 electric motor and the "MX" House. The MIDDLE holds a top and bottom tray and the RIGHT holds the Boiler (Erector Part "T"), which is the key to all the "big league" sets. This latter part does not actually boil anything -- rather, it is a rounded piece of steel that can be shaped into a cylinder. It can be made to look like almost any component of a complicated machine.
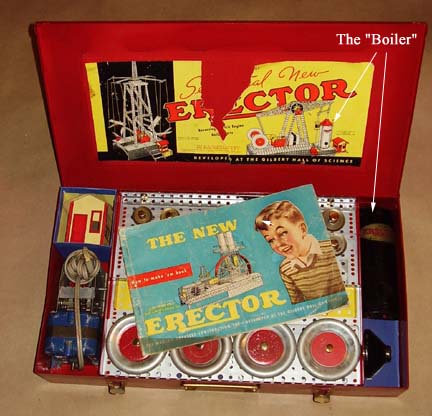
Introducing the Boiler in the Number 7 1/2 set
The signature piece of the 7 1/2 set is the Walking Beam Engine a very early steam engine from the time of James Watt. Steam is not involved -- the electric motor supplies all the power -- in a sense the boy had to spend a lot of time and effort using an advanced technology (electricty) to simulate the actions of an obsolete technology (steam.)
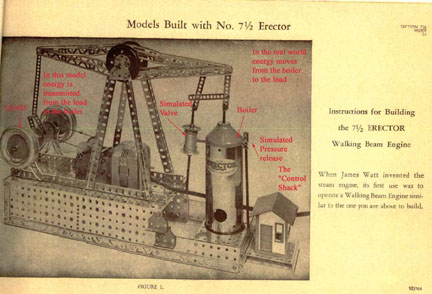
The Walking Beam Engine Model
Almost Like James Watt's Engine
Why do it? Even as late as 1950, it was possible to see these old Walking Beam monsters running pumps. With only a brief bike ride into the country, you could watch them operating in the legion of small oil wells that surrounded the Pittsburgh area (Pittsburgh was the OPEC of the 1890s, beginning with the first oil well in Titusville, Pa.)

Top(l.) and Bottom (r.) Layers of the Number 7 1/2 set
Two Parts Cans
The top and bottom layers of the 7 1/2 set are marked by the careful attention to symmetry in the arrangement of parts. All of this is calculated to get a resounding "Gee Whiz" from the lucky boy who received this set on Christmas Day. I really never heard of anyone getting an Erector Set for his birthday. It was always on Christmas.
The 7 1/2 set had a slight flaw -- the compartment on the right is not quite big enough for the boiler. The part had to be coiled up tightly and crammed into the slot. After that, it had to be assembled:
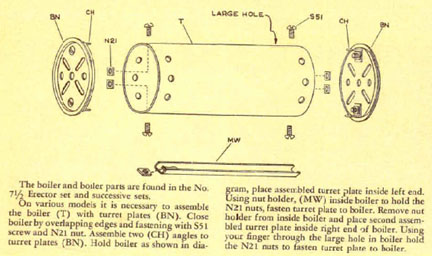
Assembling the Boiler
The Nut Holder (Part "MW") Was a Very Important Tool
The White Truck 7 1/2 Set From the 1920s
The 7 1/2 set has some distinguished ancestors, beginning in 1926 when the White Truck made an appearance in the "How to Make 'em" manual. The Erector Set version was derived from a pressed steel toy truck (sold by Gilbert), that was a scale copy of a real truck made by the White Motor Company. Gilbert introduced about 20 new parts made specifically to build the truck model. These parts were standard for the top-of-the-line No. 10 set. However, Gilbert also added a "specialized" version of the No. 7 1/2 set that made the White truck and a wide variety of variants including tow trucks, fire trucks, and a double-decker bus. The "White Truck Set" was sold for approximately seven years as a stand-alone set. Erector sets well into the 1950s at or above Level 10 1/2 continued to have the 1920s styled White Truck parts.
The 1926 White Truck Set
(left) "Extra" parts list
(right)Variations on the White Truck
Click to Enlarge
1928 Parts and Price List
Click to enlarge
We have obtained the 1926 White Truck manual and are very pleased to share it with you:
- Part One (2.4 MB)
- Part Two (3.0 MB)
- Part Three (3.1 MB) (Includes Price List for 1928)
The manual has been scanned in three easy-to-download ".pdf" packages of about 2 MB each. Enjoy!
Off-Brand Erector Sets
During this time, the Gilbert Company manufactured construction sets for other vendors that were very (very) similar to the Erector. These "off-brand" sets were sold by large merchandise houses such as Sears, J.C. Penney and Montgomery Ward. Generally, these stores would not discount Erector but were free to sell their own brand. As you can see, the various off-brand sets were almost identical save for the name.
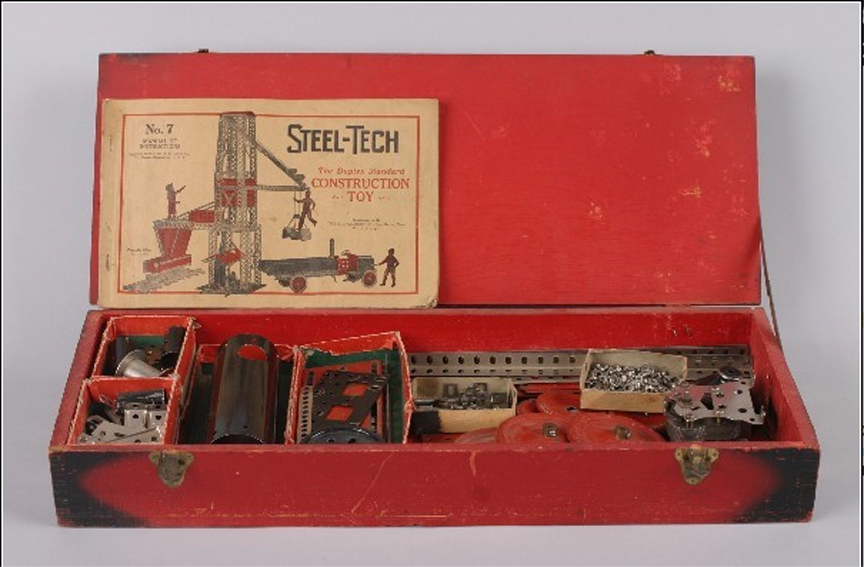
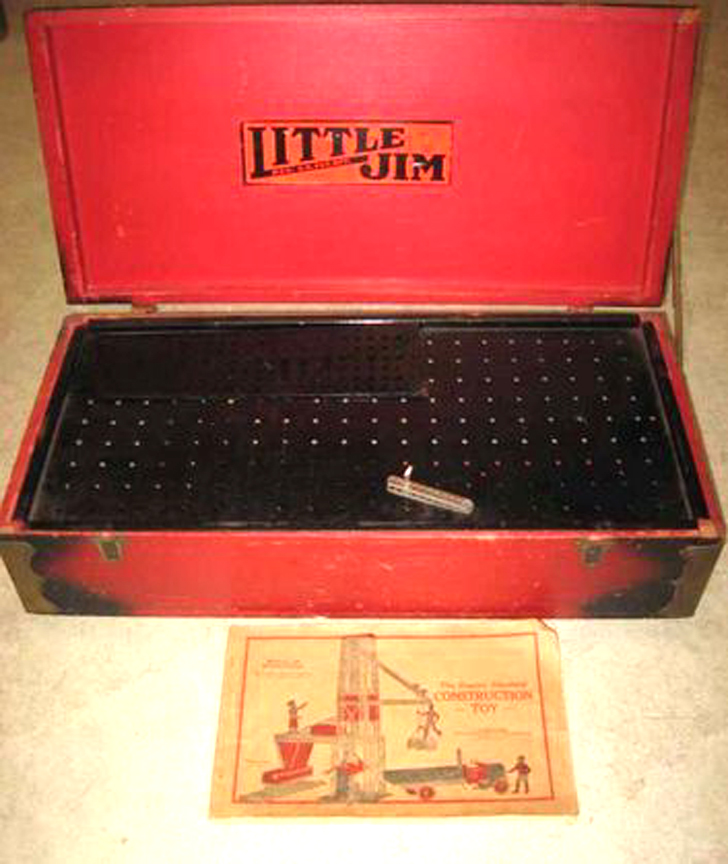
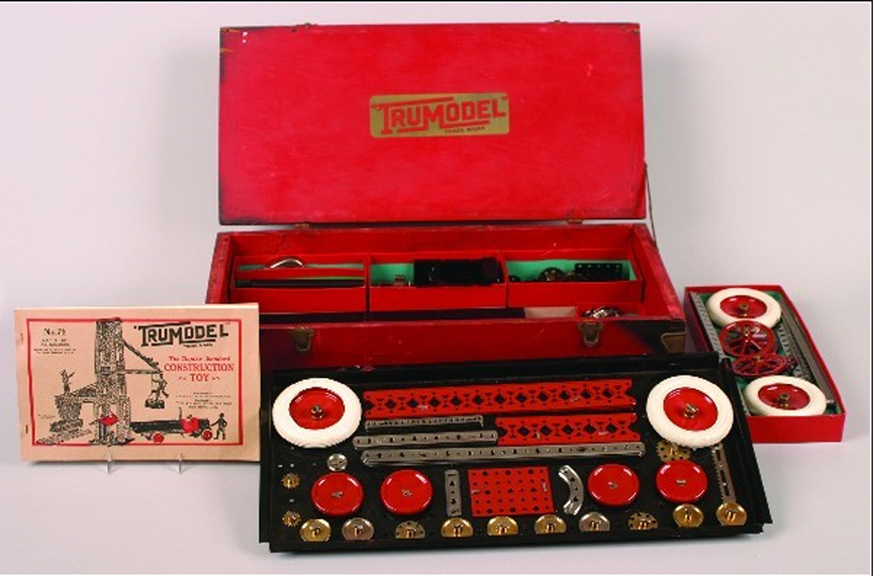
"Off Brand" Sets Made for Other Merchandisers
(left) Steel-Tech Made for Sears-Roebuck
(middle)Little Jim Made for J. C. Penney (The "J" is for James)
(right)Tru-Model Made for Montgomery Ward
These sets were made in the period 1927-1932
Click to Enlarge
Final Note on the 1950s 7 1/2 Set
Before leaving the 7 1/2 set, we should take a minute to look at part "MX". This is the little "house" or "shack" or "control cab" that came with every Erector set. This is the most memorable part because it was already assembled and gave a human touch to the project. The Boy could imagine himself in that shack, operating the machinery or getting out of the cold and rain for a cup of "java." The MX is common to all Erector sets and represents a great democratizing trend. No matter how poor you were, you always could imagine a roof over your head. People hung on to these things. I have never seen a set, no matter how poor condition, without "MX". Some sets may have two, three or four of them as people moved up the chain and pooled their sets.
My 1950s Era No. 81/2 Set
The 8 1/2 Set is also known as "The Ferris Wheel Set" -- it contained enough parts to construct a very detailed model of this amusement park ride.
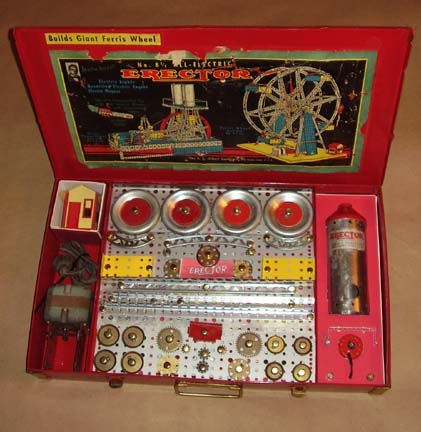
The "Christmas Day" view of the Number 8 1/2 set
The Ferris Wheel
For some reason, the folks at the Gilbert hall of Science thought that amusement park rides would be of interest to Boys. We have already seen the "Airplane Ride" as the signature of the 6 1/2 set, and the trend continues with the 8 1/2 set. The complete instructions for the Ferris Wheel ran to six pages.
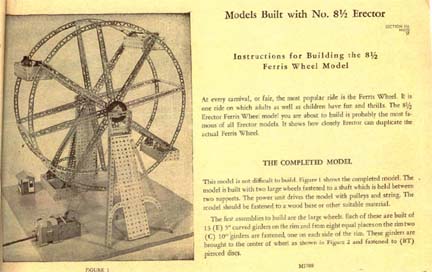
Instructions for the Ferris Wheel
Note that the model includes Part "MX" -- in this case, the ticket booth
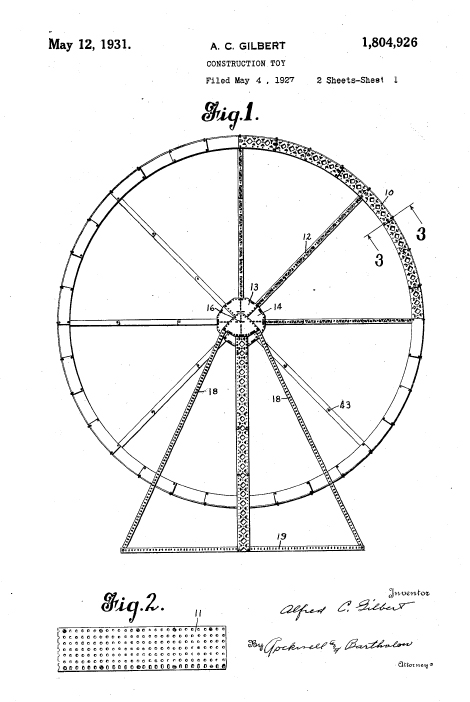
Mt. Gilbert Patented the Erector Ferris Wheel Design (Patent 1,804,926)
Click on the Patent Drawing to Enlarge It
Our Patent Page will tell you how to get patent drawings for free
The 8 1/2 set was considerably bigger than the 7 1/2 set and had quite a few more parts. Of note is Part "MJ", the lifting electromagnet seen at the bottom right in the picture above. This could be connected to a couple of "D" cells and it was possible to construct a crane that would lift any iron or steel parts (when the current was on). Shutting the current off would drop the parts, so you could spend hours playing "junkyard" lifting model cars into a dump truck.
The "Stiff Leg Derrick" was powered by the mighty A-47 motor and operated with pulleys, gears, etc. just like its real world counterpart. In this case, "MX" plays the role of Control Cab.
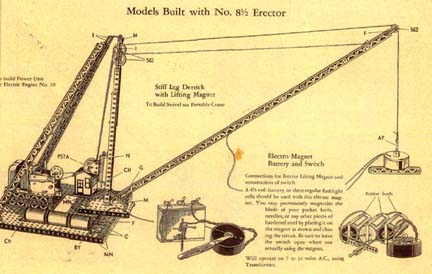
Stiff Leg Derrick with Lifting Magnet
This is really a nifty piece of engineering
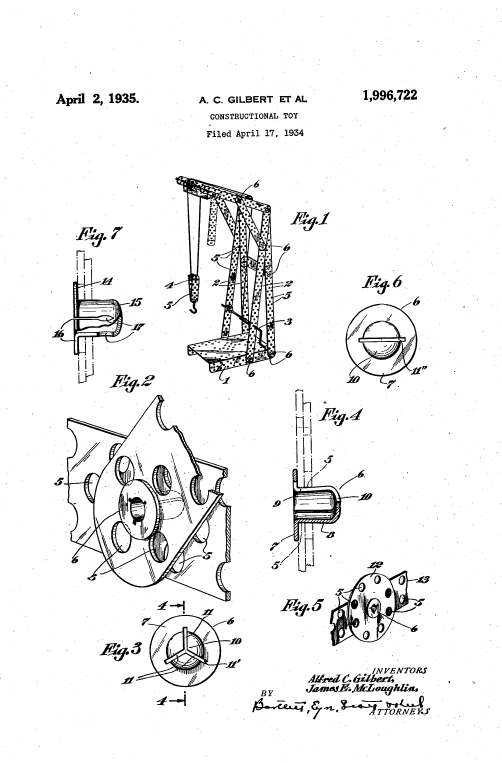
Mr. Gilbert Patented the Lifting Derrick Design (Patent 1,996,722)
Click on the Patent Drawing to Enlarge It
Our Patent Page will tell you how to get patent drawings for free
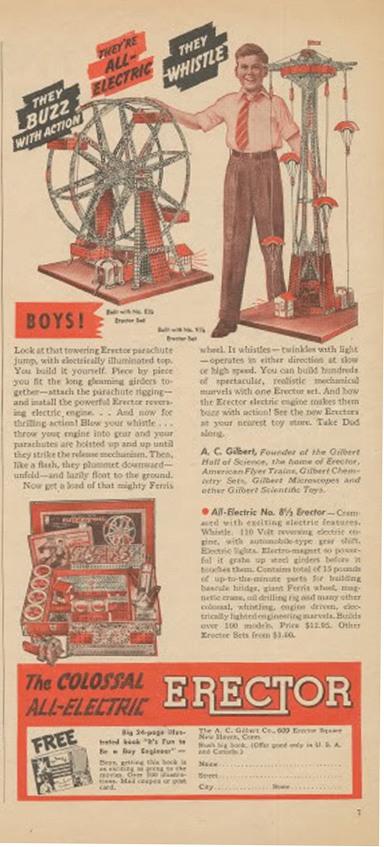
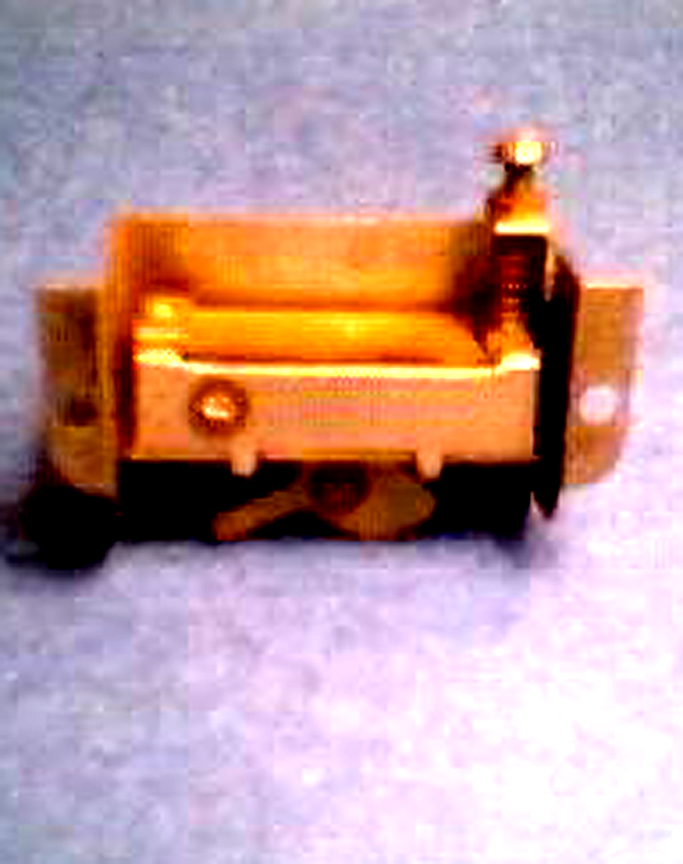
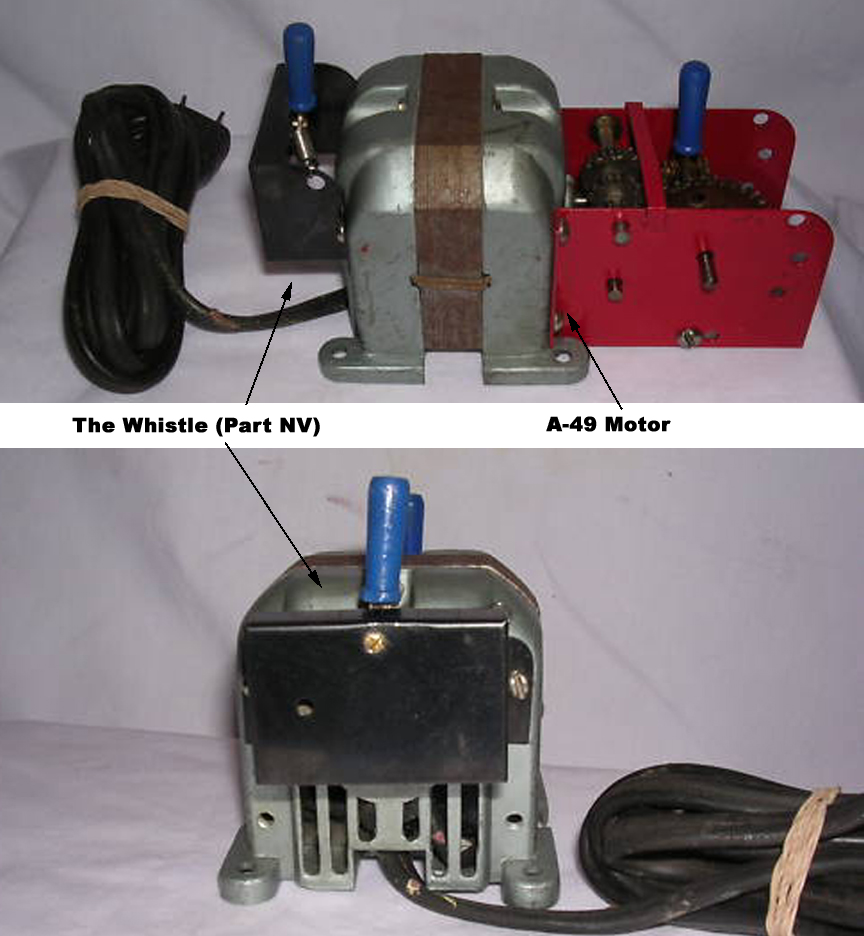
In the 1939-1940 sales year, Gilbert came up with a novel idea to add sound to the various models. The solution was rather simple, Part "NV" ("The Whistle") was simply a box with a reed in it. A P-13 gear was mounted on the end shaft of the motor (as shown...) and the rattling of the gear against the reed produced a sound somewhere between a whistle and a siren. This was not included in other sets.
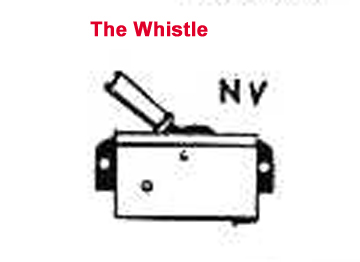

The Whistle
Ad for the whistle -- size is misleading as always
Click to Enlarge It
Here are some photos of my set:

Top Layer of the 8 1/2 set
Bottom Layer of the 8 1/2 set
The two layers show the Gilbert company's penchant for attractive, symmetric display.
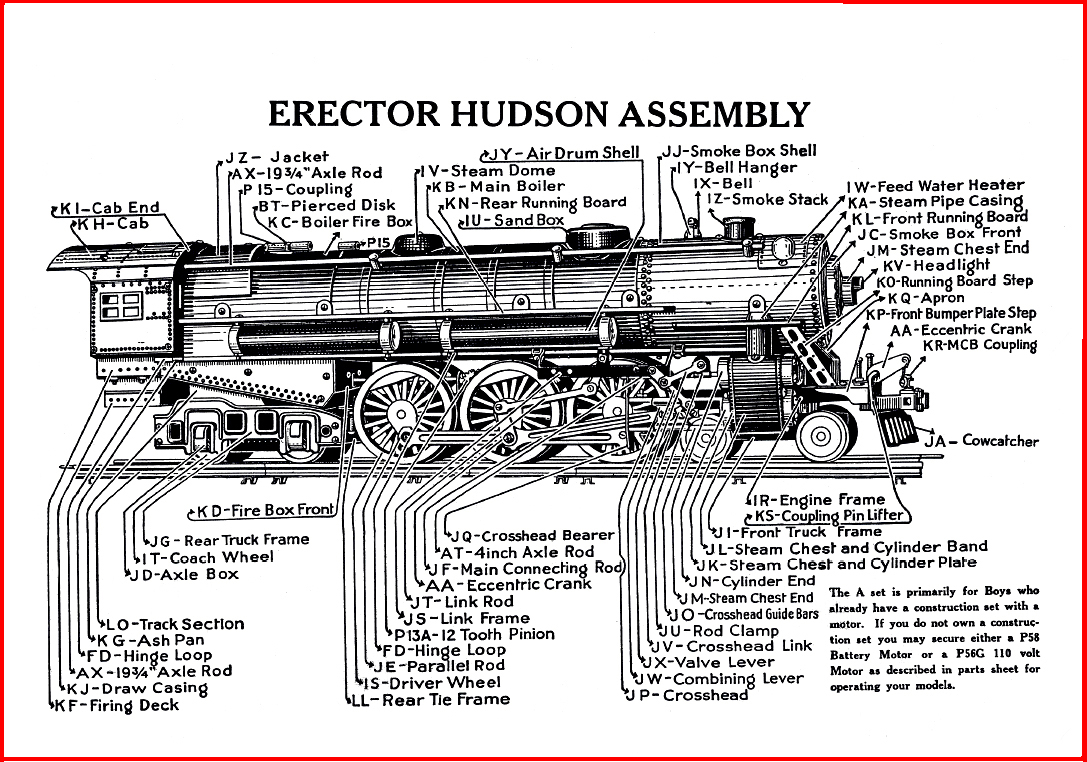
The Very Famous No. 8 1/2 Erector Hudson Locomotive and Tender Set
In the late 1920s, the Gilbert Company made a foray into specialized models, beginning with the White Truck Set discussed above. The most complicated of the specialized sets was the Hudson Locomotive (introduced in 1930-1931, and the Hudson Locomotive and Tender (1932-1937). These kits have about 80 special parts that build an No. 4 Gauge version of the famous Hudson Steam locomotives that pulled the 20th century Limited.
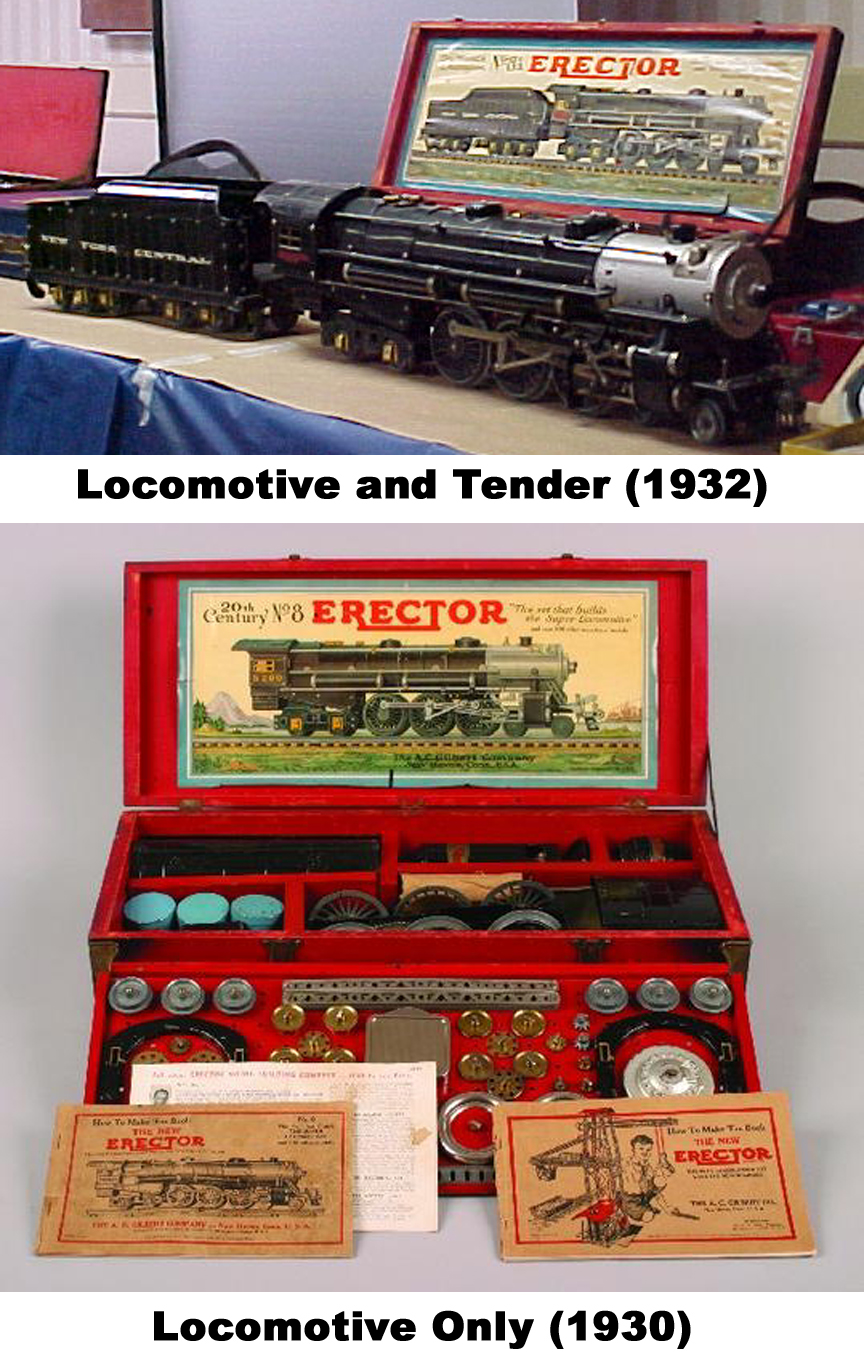
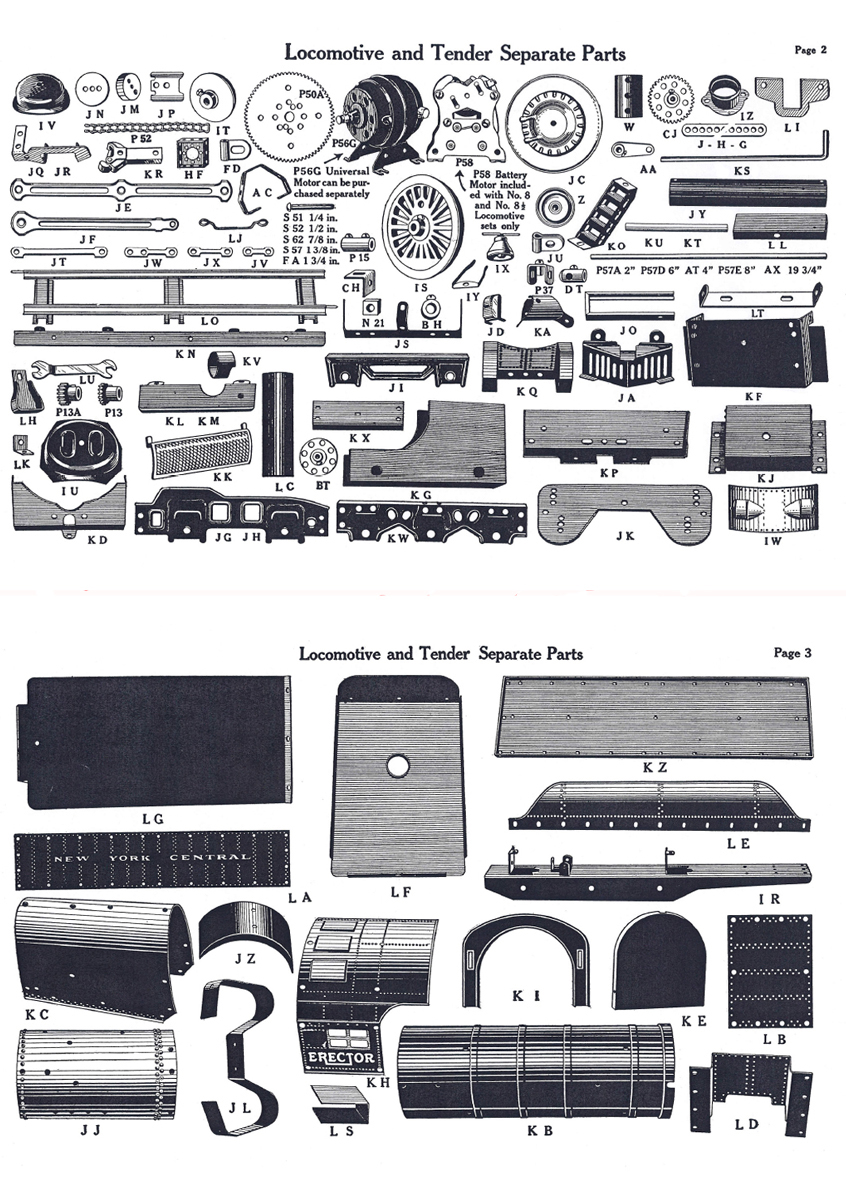
The Hudson Locomotive Set
(left): Set Appearance
(middle) Locomotive Nomenclature and key to parts
(right) specialized locomotive parts
Click to Enlarge
We have been fortunate to obtain a copy of the manual for the Hudson set and are pleased to share it with you:
For your convenience, the manual has been separated into two easy-to-download sections of about 2 MB each. In case you are interested in dimensions:
- The Locomotive is 28 inches long, cowcatcher-to rear cab
- The beam (maximum width) is 5 1/4"
- The flange-to-flange distance between the driving wheels is 2 3/4"
- The center-to-center distance between the driving wheels is 3"
- The Tender is 19 1/2 inches long
- The scale is 1:15
Yes, this is a real monster!!
The 9 1/2 set was the "top of the line" for quite some time. This is a heavy set, about 35 pounds that has a lot of specialized parts.
The Distictive Blue Box
Only During the late 1940s
The 9 1/2 set was only made in a blue box during the 1940s. There are comparatively few differences between the 9 1/2 and 10 1/2 -- and when the latter was issued, the former was discontinued.
Although the graphic on the inside of the top lid is much like the 8 1/2 set, an add-on sticker gives a clue to the signature model for this class -- the Parachute Jump.
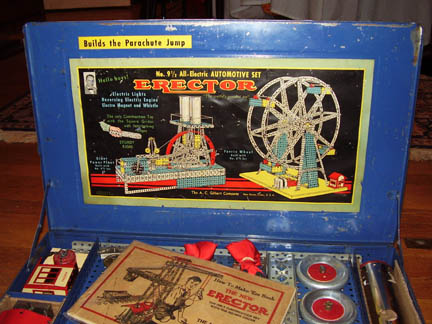
"Builds the Parachute Jump"
As we have noted, the folks at Gilbert thought that amusement park rides were of great interest to Boys, and the most exotic "ride" of the 1940s was the famous Prachute Jump at Coney Island where patrons were hauled up 262 feet in the air and dropped on parachutes! Here is a picture of the actual "ride" and an ad for Erector sets featuring the Parachute Jump.
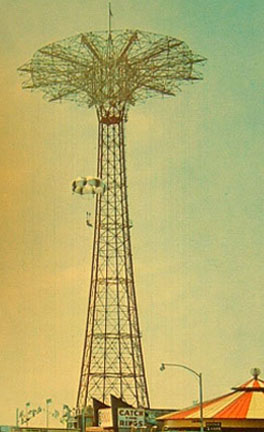
Click here for a complete discussion of the Parachute Jump.
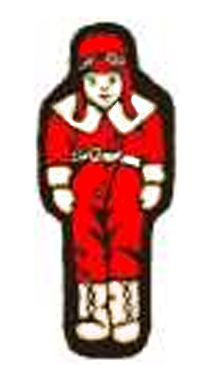
The Parachute Jump required actual parachutes (Part "NU"). These were made of silk and had a little paper "parajumper" at the end. They are almost impossible to find in orginal condition, so I have included a link to a site that tells you how to make them from scratch (see below in the "restoration" section)
Advanced Erector Parts
Part "NU" is the Parajumper
Of some note are two additional parts categories: "CS" is a circle segment, comprising 1/8 of an arc; these may be bolted together to form a ring about a foot in diameter that is the foundation for many models (see Carousel, below). In addition, Part "CA" is a signal arm", part of a plan by the Gilbert company to integrate Erector models with American Flyer trains. In fact, the Back Cover of the How to Make 'Em Book shows an integrated layout with Erector Amusement Park models and American Flyer Trains. As usual, the scale is exaggerated.
Trains and Amusement Park Rides
A Clever Marketing Trick
Here are the views of the layers of the 9 1/2 set
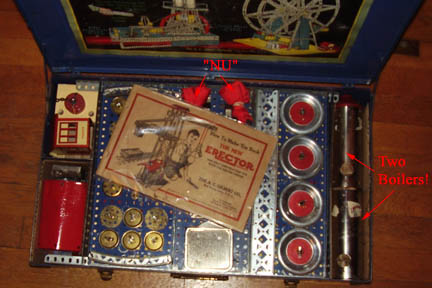
You got TWO Boilers
Once again, the parts are laid out in a very tempting fashion, maximizing the impact of Color and Symmetry. Gilbert certainly knew how to inspire Boys!
The 10 1/2 set is somewhat anticlimactic -- it is only marginally different from the 9 1/2

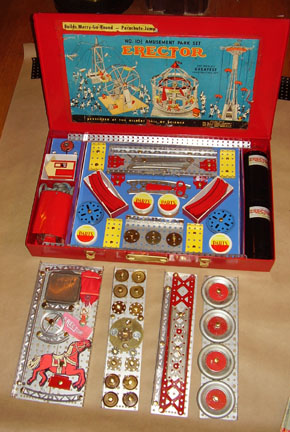
The "Christmas Day" view of the Number 10 1/2 set
The Carousel has been added
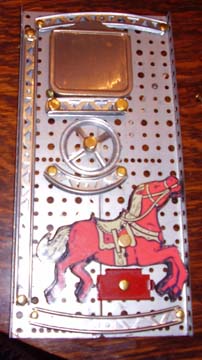
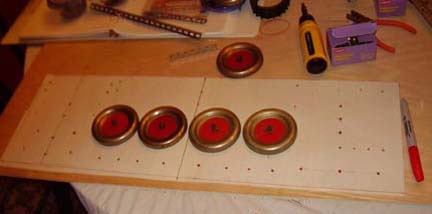
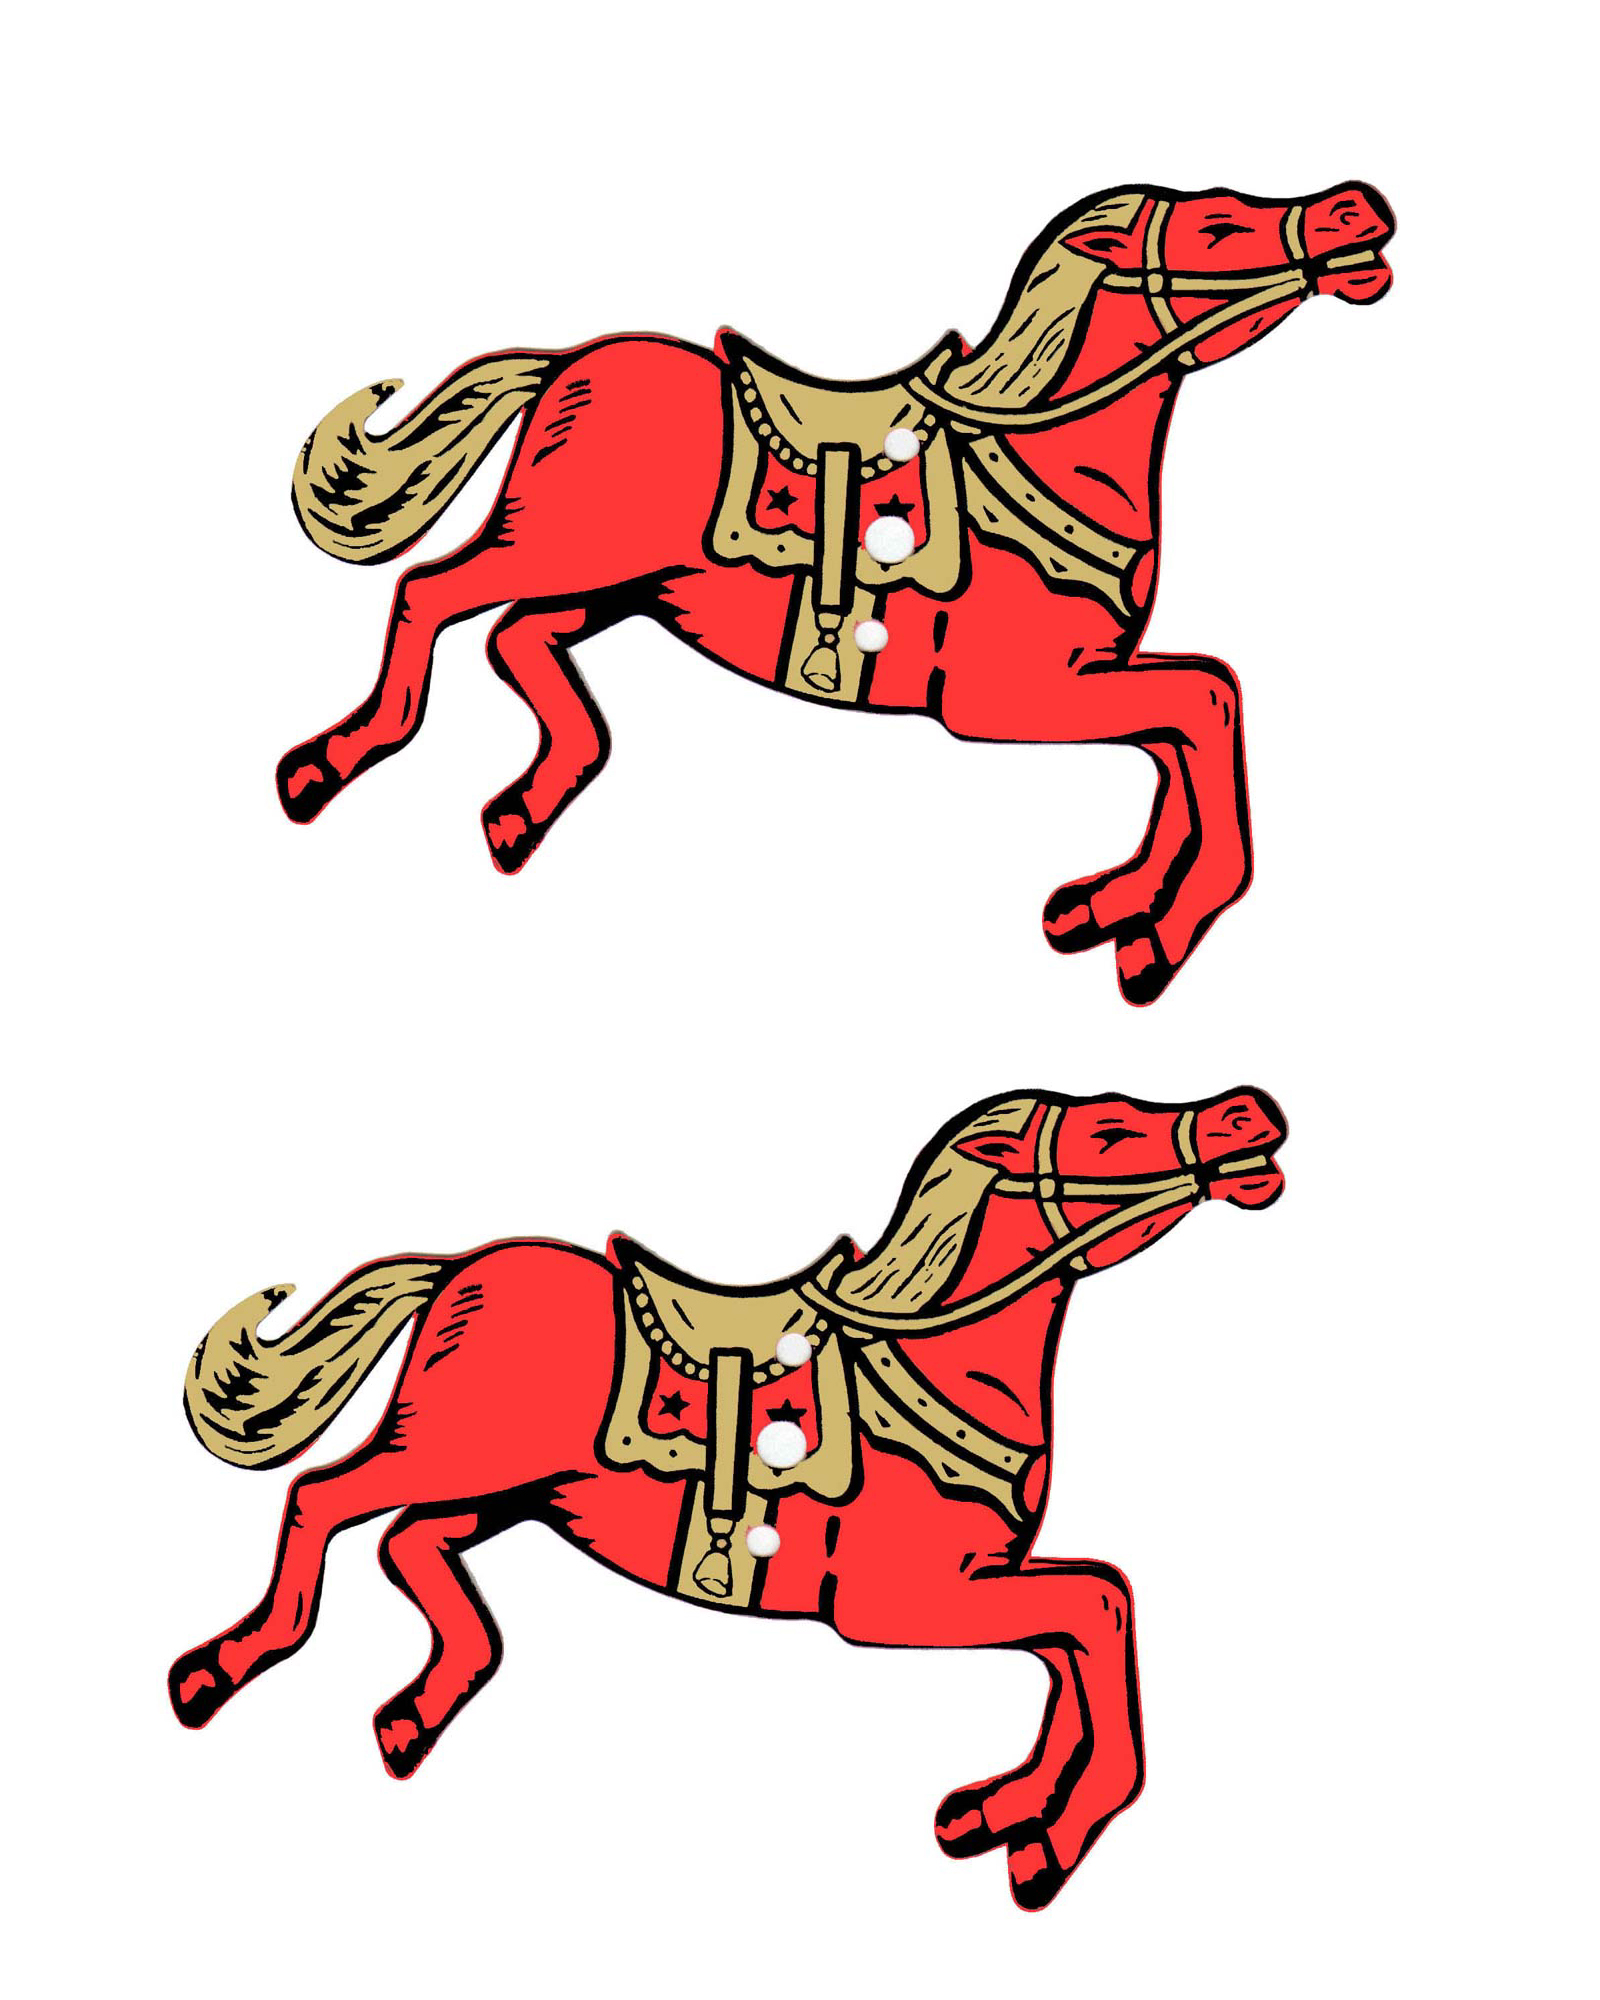
The principal difference between the 10 1/2 and the 9 1/2 is the Carousel -- the former has a few more girders and the distinctive Horses (Erector Part "OF") These horses were originally made out of paper and have long since vanished. I had to make my own, as outlined below in the Restoration section.
Closeup of the bottom tray
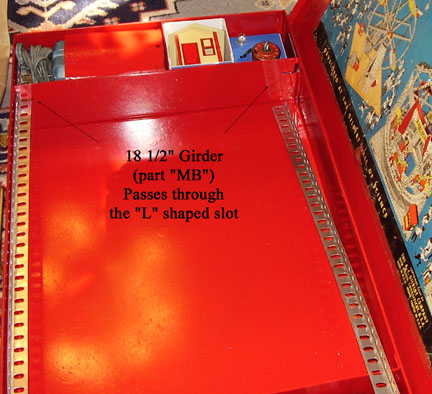
This isnt intuitively obvious, except when it is pointed out...
In order to help you put your 10 1/2 set together, I can share something that took me a lot of puzzling. The top tray is supported by two 18 1/2" right angle girders (Part "MB") that fit through the "L" shaped slots in the box ribs (as shown in the photo.) In addition to supporting the tray, they also help hold in the contents of the right and left chambers (Boilers, Motor, "MX" Shack, etc.)
The "Box" for the bottom layer
This is made out of illustration board
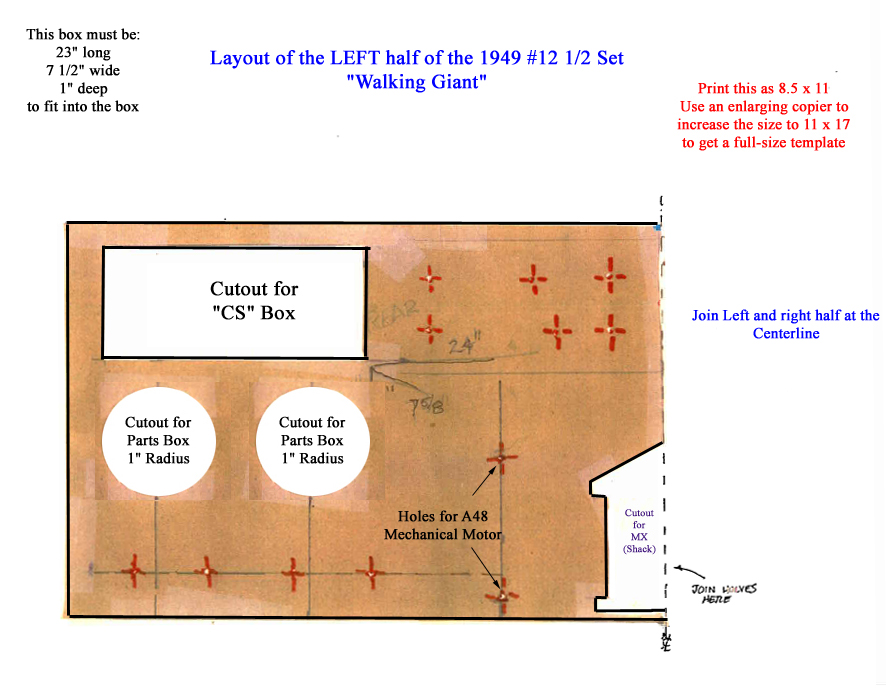
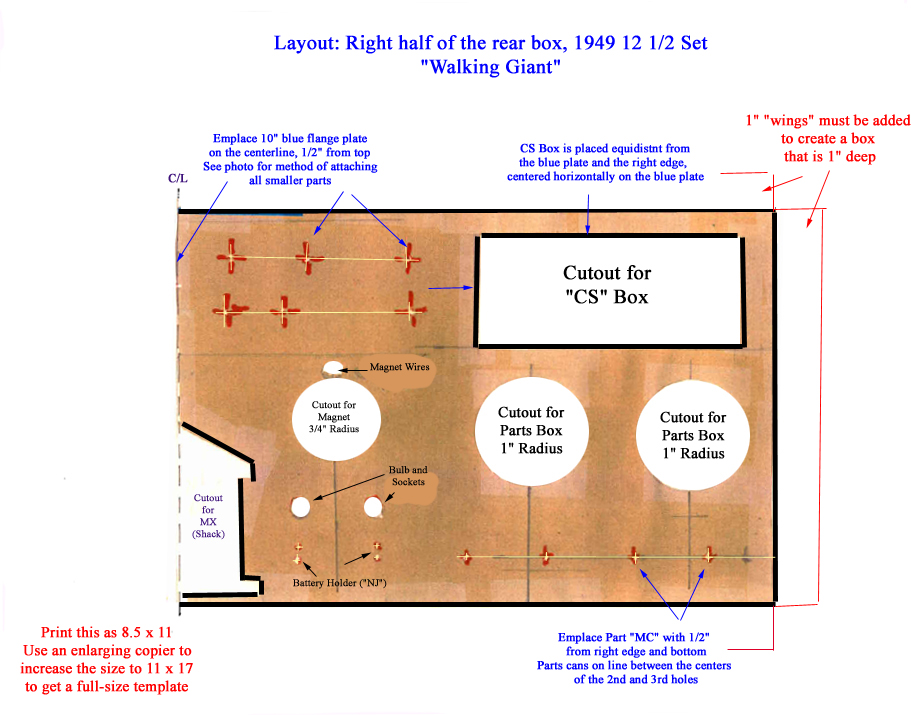
The bottom layer is a cardboard box that has cutouts for the various items, Parts Cand, "CS" Boxes and the like. Girders, gears, baseplates and the like are artfully arranged on the box and held on by split end brass fasteners that pass through strategically placed holes. Original boxes are almost impossible to find, and I bought this one from a supplier. In the "restoration section" you will find templates for making your own boxes, although it does take a lot of time and patience.
The Completed Bottom Layer
This shows the "CS" boxes and Parts Cans in place
Once again, I am very impressed with the Gilbert Company's use of color and symmetry to create an attractive display. Of course, once the Boy began to use the set, it degenerated into a massive tumble of parts. Putting one of these sets back into original condition is like reversing entropy...it takes a lot more effort to get it organized than to take it apart.
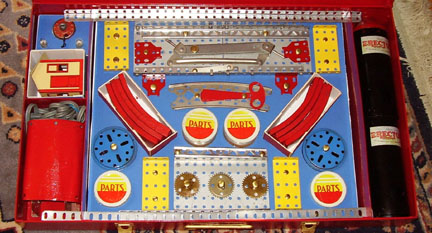
The Total Set
The Horses and Parachute Jumpers give it flair
This is the complete 10 1/2 set -- it really has a very smart appearance.
As we have hinted before, the 12 1/2 set is the "be-all and end-all" of erector sets. Here's an ad from the period that even has Superman's endorsement:
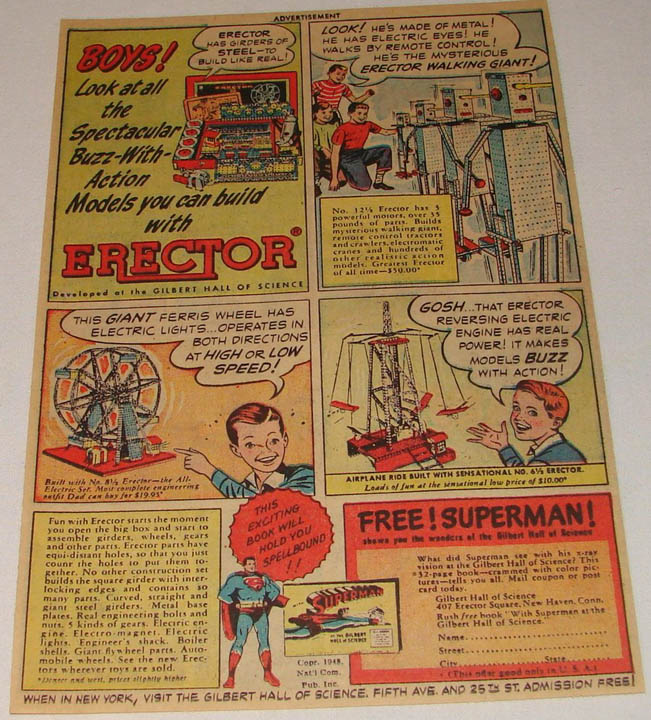
Superman and the Walking Giant
Click to enlarge
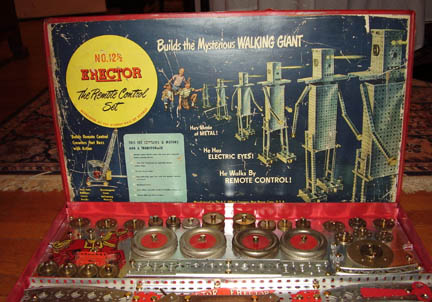
The Inside Lid of the 1949 12 1/2 Set
It became a ROBOT in 1950
The 12 1/2 set has everything that all the smaller sets have (of course in larger quantities...) with the addition of some unique items like the remote-control P-55 DC motor and its electrical transformer. In 1949, the lid referred to the "Walking Giant" -- however in all subsequent years, this fellow became the "Walking Robot."
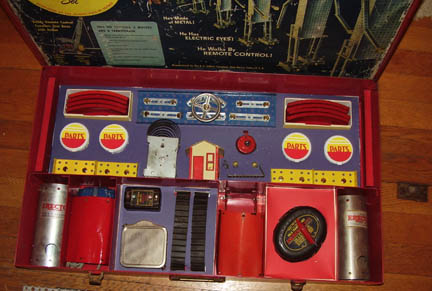
Bottom Layer of the 12 1/2 set
Layers of Imagination
This set has a large number of trays -- there is a bottom box that holds the "MX" shack, the wind-up motor, the magnet and the two boxes for "CS" segments as well as four parts cans. In addition to this, there are six compartments at the front that hold the two boilers, the A-47 AC motor, the treads and remote control, the DC P-55 motor and the Transformer. There are a considerable number of parts underneath the bottom box as well.
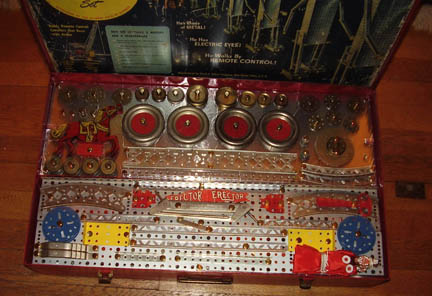
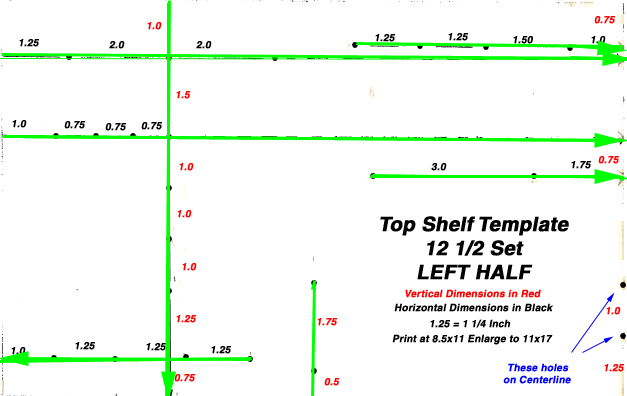
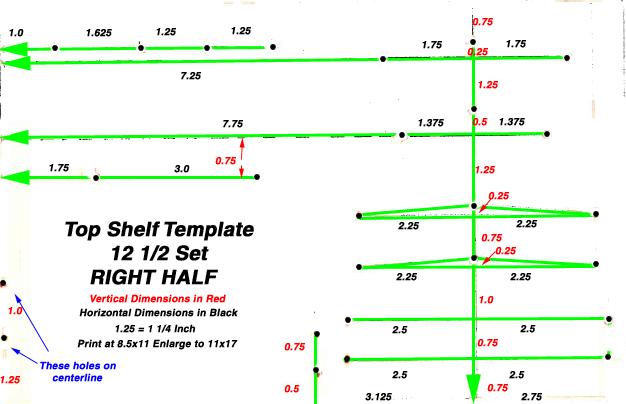
Top Layer of the 12 1/2 set
These stand out
The Top Layer is composed of two trays. The back tray holds wheels, gears and large girders and the Horses, and it rests on rails. The Front Tray is made up of "MN" baseplates bolted to the 18" "MB" Girders, and it rests on the compartment walls. All of the parts are displayed with the impression of limitless possibility.
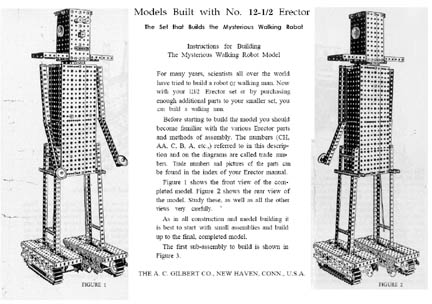
Front Page of the Instructoins for the Walking Giant
Four Pages of Detailed Drawings
This is the beginning of the part of the instructions that explain the construction of the Walking Giant. They use every trick in the book!.
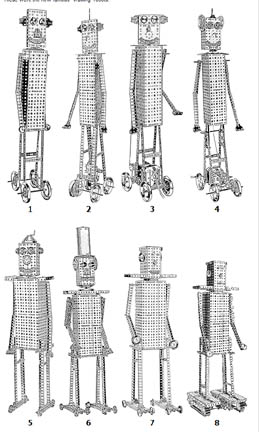
Variations on the Walking Giant
Eight Possibilities
There are a wide variety of configurations that have been dreamed up for the "Walking Giant". Here is an article that will explain them all. The Giant/Robot even managed to make the cover of the December, 1948 issue of Popular Science:
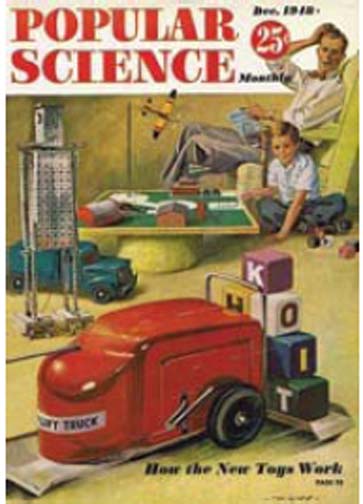
Walking Giant, Cover Guy
From the December 1948 Issue of Popular Science
Click on the Photo to Enlarge It
Next, we'll show you the kind of sets produced by Gilbert's competitors.
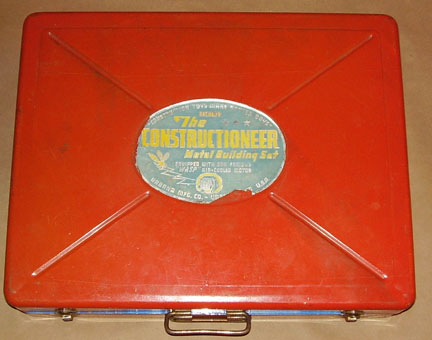
Case for the Constructioneer #12 set
Competition for the Erector 12 1/2 Set
Over the years, a number of companies produced construction sets that competed with the Gilbert Erector Set. One of these was the Urbana Manufacturing Company (of Urbana, Ohio.) Harkening back to A.C. Gilbert's World war I experiences with steel priorities, it seems that the just after World war Two,Urbana company had accumulated a fairly large surplus of steel -- most likely the result of bureaucratic bungling of some sort as was common during the period. In short, Urbana had steel while Gilbert did not, so they plunged headlong into the postwar boom in children's toys by offering their own toy whose name fused the words "Construction" and "Engineer." Both words, as we have observed above, were music to the ears of parents. The Constructioneer sets were first sold in 1946 and lasted only until 1952 when Urbana was put out of business following a Patent infringement case brought by Gilbert. As you will see below, there is little mystery in why Gilbert brought the suit.
Constructioneer sets came in red metal cases and were originally numbered 4, 6 and 8 while [not-so strangely] the most popular Gilbert sets were 4 1/2, 6 1/2 and 8 1/2. The Number 12 set featured here was offered only in 1950 and is a response to the hullabaloo created by the Gilbert 12 1/2 set. The Constructioneer sets featured amusement park rides, and the #12 set featured a carousel with horses. The major difference between the sets was that the Constructioneer's "Wasp" engine only worked with pulleys while the Erector's A-47 motor was famous for all sorts of gear/pulley combbinations.
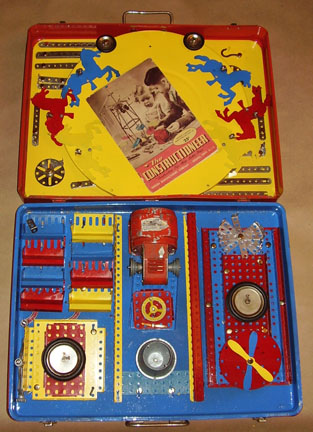
"Christmas Day view of the Constructioneer #12 set
Lots of Color
The Constructioneer set had a lot of color. The #12 set had four major components: (1) the Case; (2) the Blue Tray; (3) the Yellow Tray; and (4) the Platter. The photo above shows what the set would have looked like when the Boy first opened it on Christmas Day. As you can see, liberal use was made of Red, Yellow and Blue. You'll also note that the parts are much more representational -- the Ferris Wheel seats (middle left) actually look like their amusement park counterparts while the Erector set required that you build these seats out of more general parts. The drawback is that the seats take up a lot of room and they can ONLY be used for the Ferris Wheel.
Empty Case for the Constructioneer # 12
"Parts" were in a box, not a can
This is the empty case. There is about 1.5" of clearnce under the Blue Tray and this was used for the storage of miscellaneous parts that could not be attractively displayed on the top trays. The bolts, nuts, and collars were kept in a rectangular box, shown in the center of the bottom part of the case. The "parts Box" had a distinctive design that I was able to copy, although the origial box was to dilapidated to actually hold anything. In the downloads section, you'll find a ".jpg" that can be used to cover a replacement box of your own making, should you desire to restore one of these sets.
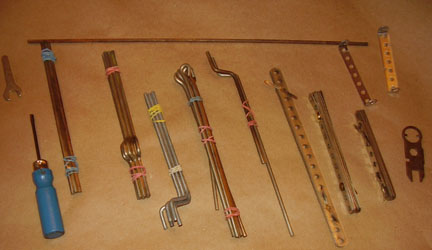
Minor Parts for the Constructioneer #12 Set
Tools, Axles, Cranks, etc.
Here are some of the "minor Parts" that were wrapped in brown paper and stored beneath the Blue Tray.
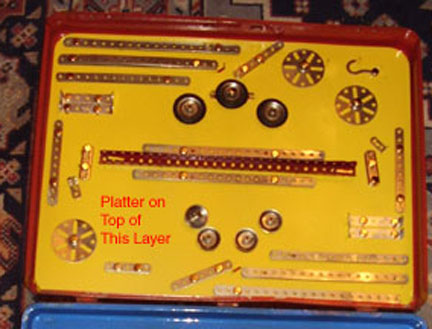
The Yellow Tray
Girders, Wheels, pulleys
This is the Yellow Tray that held most of the "flat" parts like girders, wheels, pulleys, etc. The Platter (with the horses) mounts on top of the Yellow Tray.
The Blue Tray
Motor, Seats, Plates, Propellors and the Cement Mixer
This photo shows the Blue Tray fitted out with all its various parts. The "Wasp" motor (bottom center) fits through the tray and its cord is stored below. The amusement park seats and propellors add a festive touch. In the Top center, is a Cement Mixer part that was very representational. There is no Erector part that corresponds to this.
Yellow Tray Mounted in the Case
Loose Parts Were Stored Under the Blue Tray
The yellow tray was attached to the case by two metal tabs. This photo shows the Yellow Tray plus Platter fitted to the case as well as the miscellaneous parts wrapped in paper and stored in the case bottom
Blue Tray Mounted in the Case
This photo shows the final assembly of the Set. On balance, I found this set to be of poorer quality than the Erector and it did not appeal to the imagination. I have it as a curiosity, but I do not display it with my Erector sets. This is much rarer than any Gilbert product, but it is not exciting. I have scanned in the Constructioneer manual and I will be very glad to share it with you. Unfortunately, it requires about 7 MB. Since I pay by the byte, I haven't included it in the downloads section. BUT if you contact me, I will be very glad to e-mail you a copy. You should have a fast connection to do this...
In the early 1960s, the Gilbert Company offered "Sound Effects" for erector projects. This took the form of a very simplistic acoustic system in which a small record was "played" by a stylus (needle) that was attached to a diaphragm that in turn moved a speaker cone. No electric amplification was involved and the only linkt to electricity was the motor that provided the rotary motion needed to revolve the turntable.
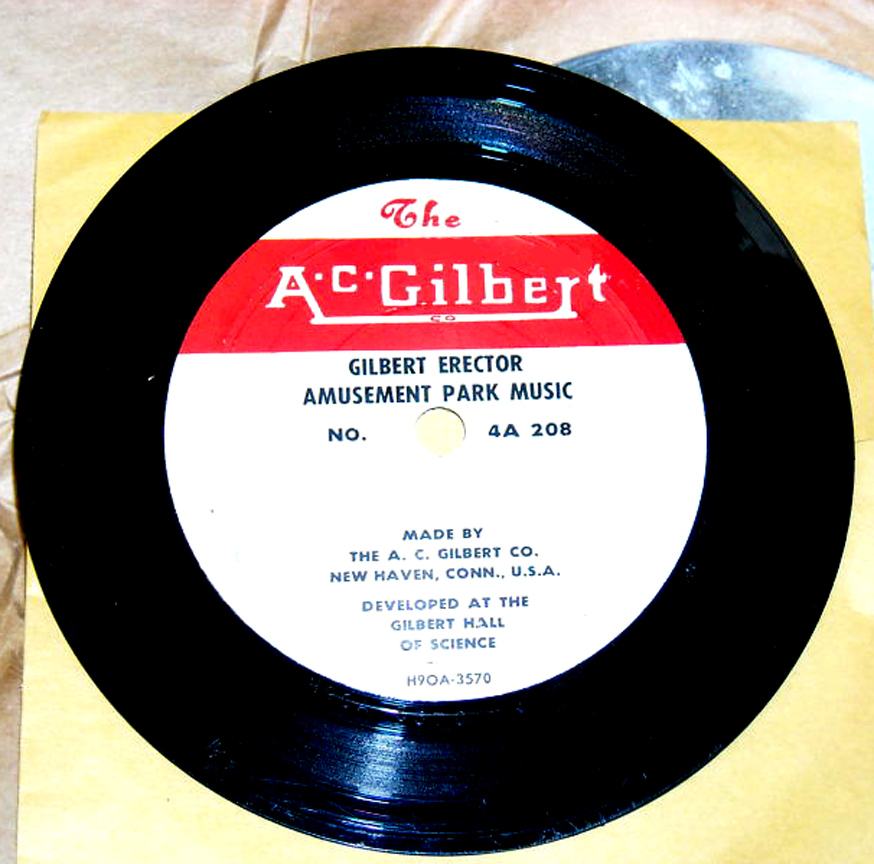
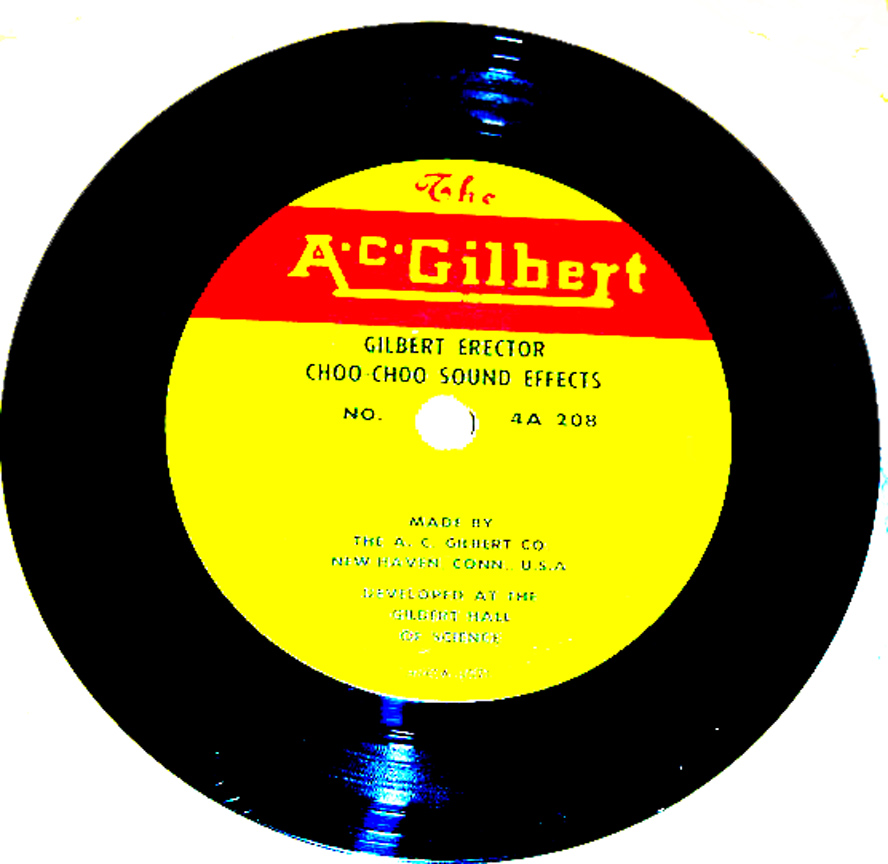
The Gilbert Sound Set
Click to Enlarge It
There only seem to be two records: "Choo Choo" sounds (for your American Flyer Train Set) and "Amusement Park" sounds for the Ferris Wheel, Carousel, Parachute Jump, etc, etc. We welcome any further comment on the sound kit from our readers.
These are lessons that I learned in restoring things. I have benefitted by the wealth of information that is on the Internet and I will salt this discussion liberally with references to authoritative sources. Any expertise that I have to offer is because I am standing on the shoulders of giants.
- Painting Things
- Parts Cans
- Part "OF" - Carousel Horses
- Part "NU" - The Parajumpers
- Set Labels
- Templates for Set Cardboard Inserts
- Miscellaneous Technical Notes
Painting:
During the Christmas season of 2007, there was a major brouhaha about lead-based paint in toys from China. If you are a Concerned Mom, you'll probably want to keep your precious little brats away from historic Erector sets, because the paint is 100% lead-based. In fact, the yellow parts are covered with pure lead chromate. [Of course, Concerned Moms would't want their non-female children to play with anything as plebian as a construction set. The only 21st Century toy acceptable for the Perfect and Special Child would be "The Little Envrionmental Lawyer" kit.)
Back in the evil old 1940s, the Boy knew that you didn't stick Erector Set parts in your mouth, and that any kid dumb enough to do that got what he deserved. Thanks to Concerned Moms and the Product Safety Bar, a vast amount of money and energy is expended on protecting dolts from themselves.
Politics aside, painting is pretty straightforward because the Gilbert company kept to primary colors. Most of the boxes are in pretty bad shape -- the paint scratches very easily and Boys are not known for being gentle. Sad to say, when the Boy discovered Girls and Cars, the poor Erector set got stuck in the basement along with Puff the Magic Dragon. Thus, you'll probably have to repaint the box. You'll have to remove the paint down to bare metal.
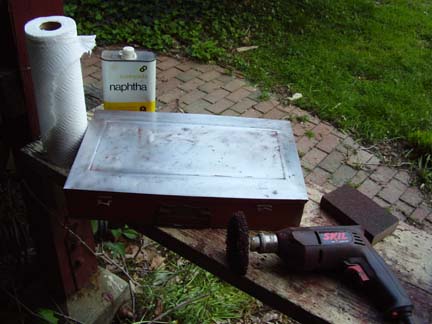
Get it down to bare metal!
Clean thoroughly with Naphtha
After careful sanding, you must clean the box thoroughly with a degreasing solvent that leaves no residue. Naphtha is best for this purpose, but please remember that it is quite flammable. After that, spray with a good quality metal primer and let it dry throroughly. After that, you can apply the color. By the way, the same advice holds for painting parts: sand, clean with naphtha and prime.
Here are widely available [and legal...] paints that match Erector colors:
- Yellow - Rust-Oleum # 7747 Sunburst Yellow
- Red - Rust-Oleum # 7762 Sunrise Red, "X-O Rust" Signal red
- Blue - NAPA # 624 - Chevy Engine Blue (1940s Boxes, MN/MD/MY baseplates, see 9 1/2 set above.)
- Dark blue - Dupli-Color # DE1606 Ford Dark Blue (1950s MD/ME/MF baseplates)
- Black - Plasti-Kote #1100 Gloss Black (or any glossy black enamel)
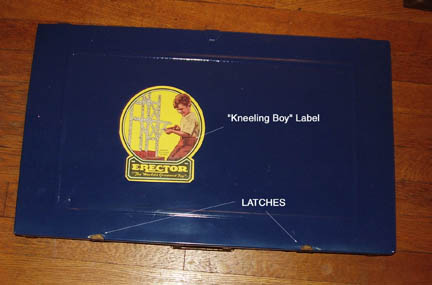
The "Kneeling Boy" Label
VERY easy to replace
The metal box cases should have a "Kneeling Boy" label on the top. Years of abuse have most likely scratched and abraided this label beyond recognition. Fear not, because you can download a VERY high resolution ".jpg" of the label and then print it out on Avery "Large Label" (#8165) stock. This will put a quality copy of the image on a self-adhesive back, more-or-less like the original. Of course, if your box has a pristine label, then you should mask around it before you paint.
More Help from the experts
- RE-PLATING rusted parts
- PAINTING instead of Re-plating
- ANOTHER alternative to re-plating
- CASTING handles for those beloved "NZ" Screwdrivers
- REPRODUCING LATCHES for the boxes
- RESTORING the big 3" Diameter "MH" wheels
With a little ingeneuity, you can repair or reproduce ANYTHING in an Erector set!
Some of you with more ingenuity that most of us, might want to try fabricating parts -- either to replace missing items or to dream up new parts. To do this, you'll need to get some 23 Gauge steel (0.61 mm or 0.024 inch thick). To help you out, we measured a whole bunch of parts and it turns out that they were all made from the same gauge of metal.
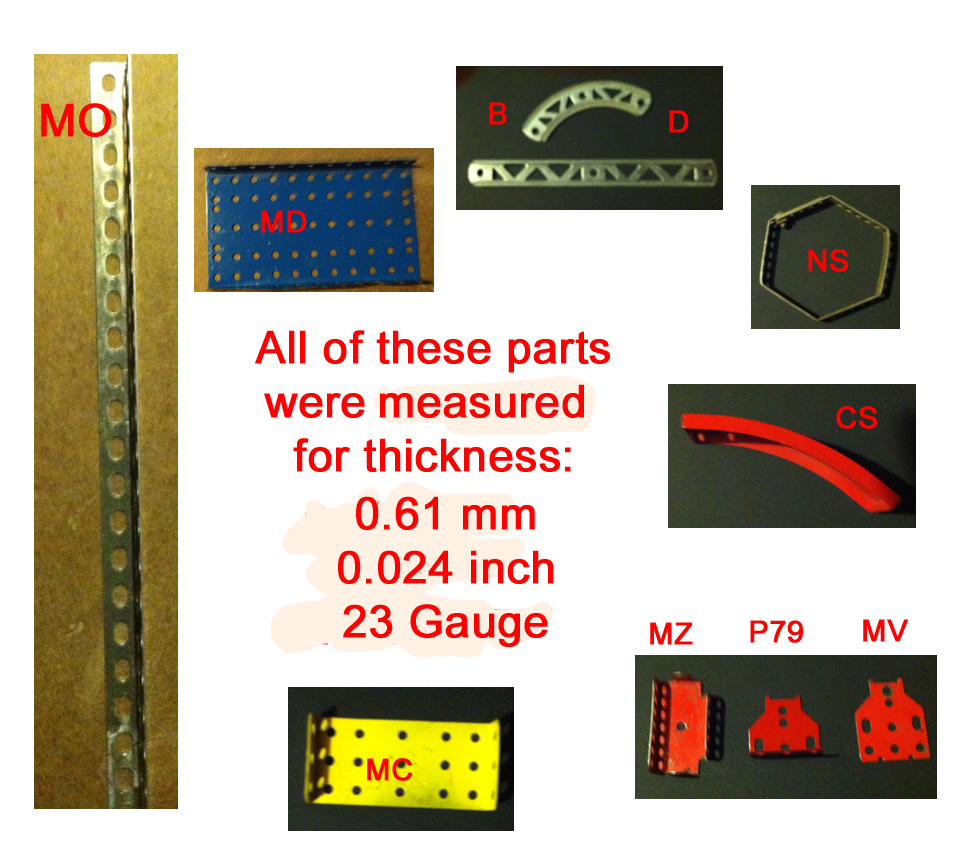 >
> Measuring the Various Parts
They all seem to be the same thickness
Click to Enlarge
You can make most of the base plates with a drill press and a bending "brake". To fabricate the girders, you are going to need a die to make the crimps and a "punch" to stamp out the triangles. It will probably require a two-ton press at least!
Recently, we got this question from a reader:
In the 1950 12 1/2 set, 2 types of 10" axles were included. I have 2 of these axles but the inventory list indicates the set includes 2 DA 10" axles and 2 P57K 10" axles. Can you tell me how these two types differ?Answer: the "DA" axles are 1/4" in diameter and the "P57" axles are 5/32" in diameter. They come in a variety of lengths from 4" to 12"
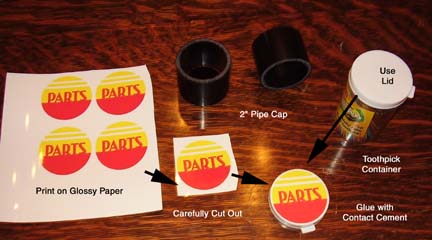
Parts Cans
The distinctive Art Deco "Parts Can" is a charming part of the Erector Sets of the late 1940s through the 1950s:

Parts Can Label
Two inches in Diameter
The original parts cans were two inches in diameter and about 1 1/2 inches high. The top was thin pressed metal and the can itself was made from a cardboard tube with a metal press-fit body. Because they were mostly paper, most of them are long-gone. If you have one can, you can try to duplicate it by using mailing tubes and sheet metal along with a LOT of time and patience. If you want to have a place-holder until you can obtain a genuine parts can from a supplier or auction, replicas may be fabricated easily. Go to a plumbing supply store and buy a 2" PVC pipe cap -- this is the exact size of a parts can and is indestructible. Next, go to a supermarket and buy a package of toothpicks in a clear plastic tube with a white snap-on cap. (that just happens to be two inches in diameter). Obtain the "jpg" for parts can labels and print them out on GLOSSY PHOTO PAPER. Cut them out and apply to the cap with super-glue or contact cement. I have found that printing these labels on Avery label stock does not give you the color-brilliance of the original parts can. Here is a tip from Bruce, one of our readers:
"... I've found a much easier way to cut parts cans holes in matte board. They sell a circular cutter at Wal-mart in their scrapbooking area. It is a round plastic disk with multiple holes at various distances from the center. The clear plastic center is mounted on ball bearing at the edge to a stationary frame held tight to your matte board. It comes with a cutter with a small X-acto blade that you put into the appropiate diameter slot and run it in circles to cut the hole. For the 5/16" or 3/8" holes, I use a hollow-core punch. They're available from Harbor Freight for under $10. Just put the matte board on a piece of oak on a cement floor and give it a whack with a hammer. An 1/8" punch works great on insert holes. ..."
Making the Substitute Parts Can
This is only a place-holder!
Other generations of Erector sets use a very different parts can -- the [above] technique only applies to 1940s and 1950s sets.
Please don't try to pass these things off as if they were originals! I am writing for the people who want to evoke the feeling of an original Erector set, not for people who try to sell restored sets. Always tell people what's original and what's not!
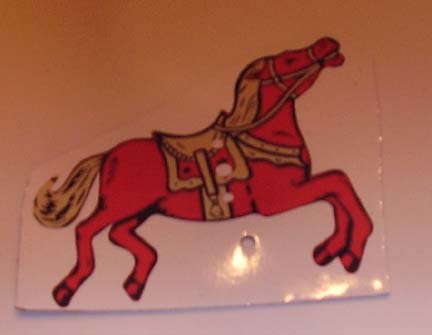
Part "OF" - The Carousel Horses
The Carousel Horse (Part "OF")
Originals in paper, later versions in plastic
The Carousel Horses were introduced with the 10 1/2 set and were made out of a stiff fiberboard paper. Later, they were made of plastic. These weren't particularly valued by kids and tend to be scarce. Paper horses are very hard to find. So, here are some tips for making carousel horses for yourself.
First, go to the download section and obtain the "Two Horse" picture. I have placed the images of two horses on one 8 x 10 image so that you can print them efficiently. Print the picture on premium glossy photo paper using the "maximum DPI" printer option. Printing two to a page will save you money because photo paper is quite costly.
Obtain a sheet of 1/8" thick chip-board (color: black) from an artist supply store. Use 3-M Spray-Mount (3M product no. 62-4662-4827-5) to mount the photo-quality prints to the board. The two will become inseparable!
Attach the Photo to the Illustration Board
DO NOT use any water-based glue!
You may then proceed to cut-out the images. Chipboard is pretty tough, so I used a little DC-powered hobby jigsaw for the rough cut and an artist's knife for the fine work.
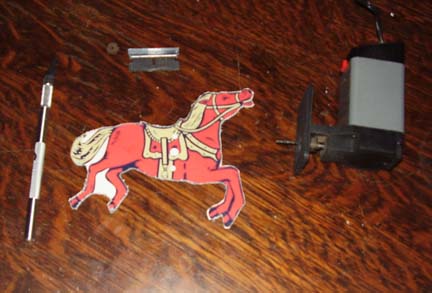
Carefully cut the Carousel Horse Figures out
Take your time!
You can use an emery board to smooth the edges. When you finish, go over the edge with a black felt-tip marker to cover the "white" remaining on the cut edge of the photo paper.
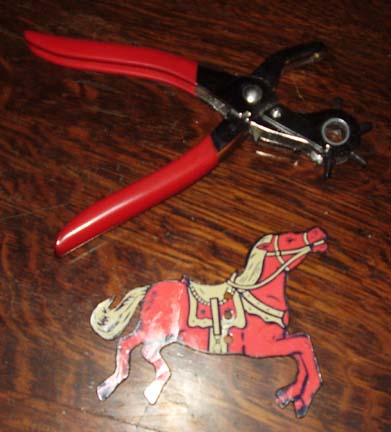
Punch Three Holes in each Carousel Horse figure
Use a Leather Punch
Use a leather punch (available at Home Depot for about $10) to punch the three holes that are used to mount the part to the carousel. The middle hole is slightly larger than the top and bottom.
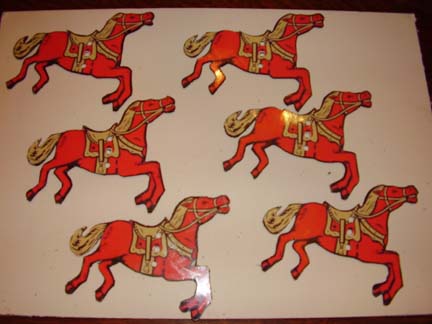
Make Six Carousel Horse Figures
It takes about an hour for each one...
You'll need six of the Carousel Horse figures. It took me about an hour to do each one. If you have more money than time, you might consider buying a set from an internet auction.
The Final Step
Pin through the Middle Hole
This is what the set of six horses looks like when it is mounted in the top layer of my 10 1/2 set
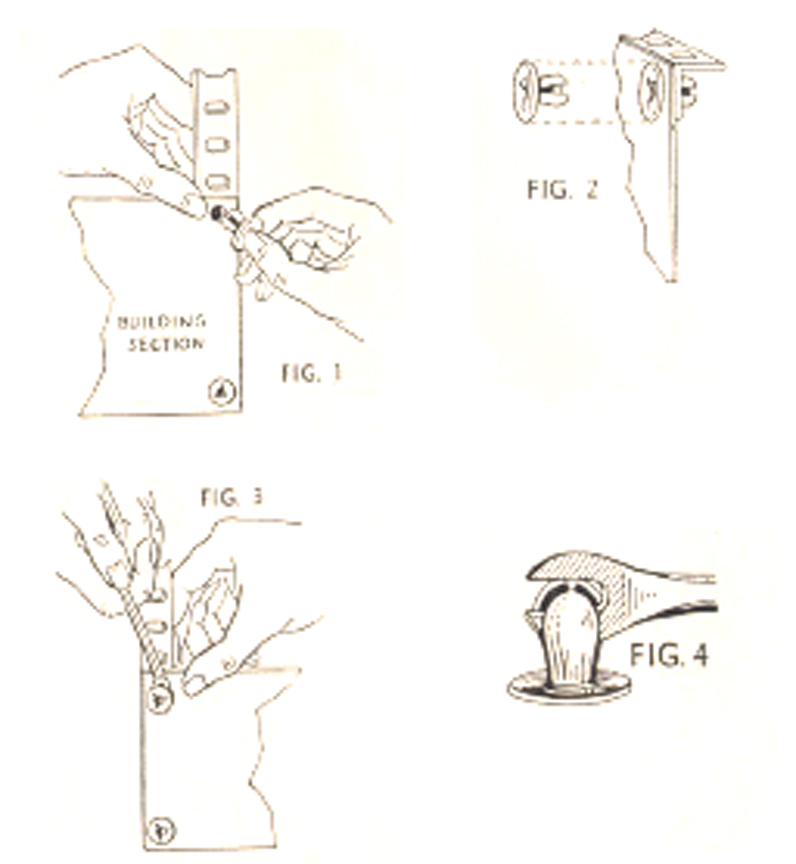
Part "NU" -- the Parajumpers
Here is a tutorial on how to make the little parajumpers that are in sets 9 1/2 through 12 1/2.
This is the Parajumper
You need four of them...
I agree wholeheartedly with the tutorial and would add four small suggestions:
- The tutorial tells you to cut the cloth for the parachute using a square. You'l do a lot better if you make a paper pattern and pin it to the fabric "on the Bias"
- If you cut the fabric with a knife, as shown in the tutorial, the edges will unravel into a mess. You should use Pinking Shears to prevent this.
- Place Waxed paper under any parts that are to be joined with Super Glue
- Use a needle threader to get the string through the small holes in the parajumpers
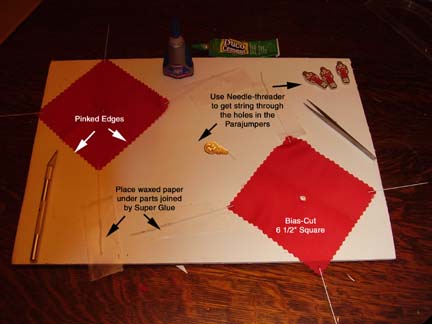
Helpful Suggestions for making Parajumpers
otherwise follow the tutorial...
You should have smooth sailing -- ask your wife, mother or girlfriend about this "bias" business... A convenient document for printing out the images (front and back) of all four parajumpers at once (saves photo paper...) is provided in the Free Downloads section.
Labels for Sets
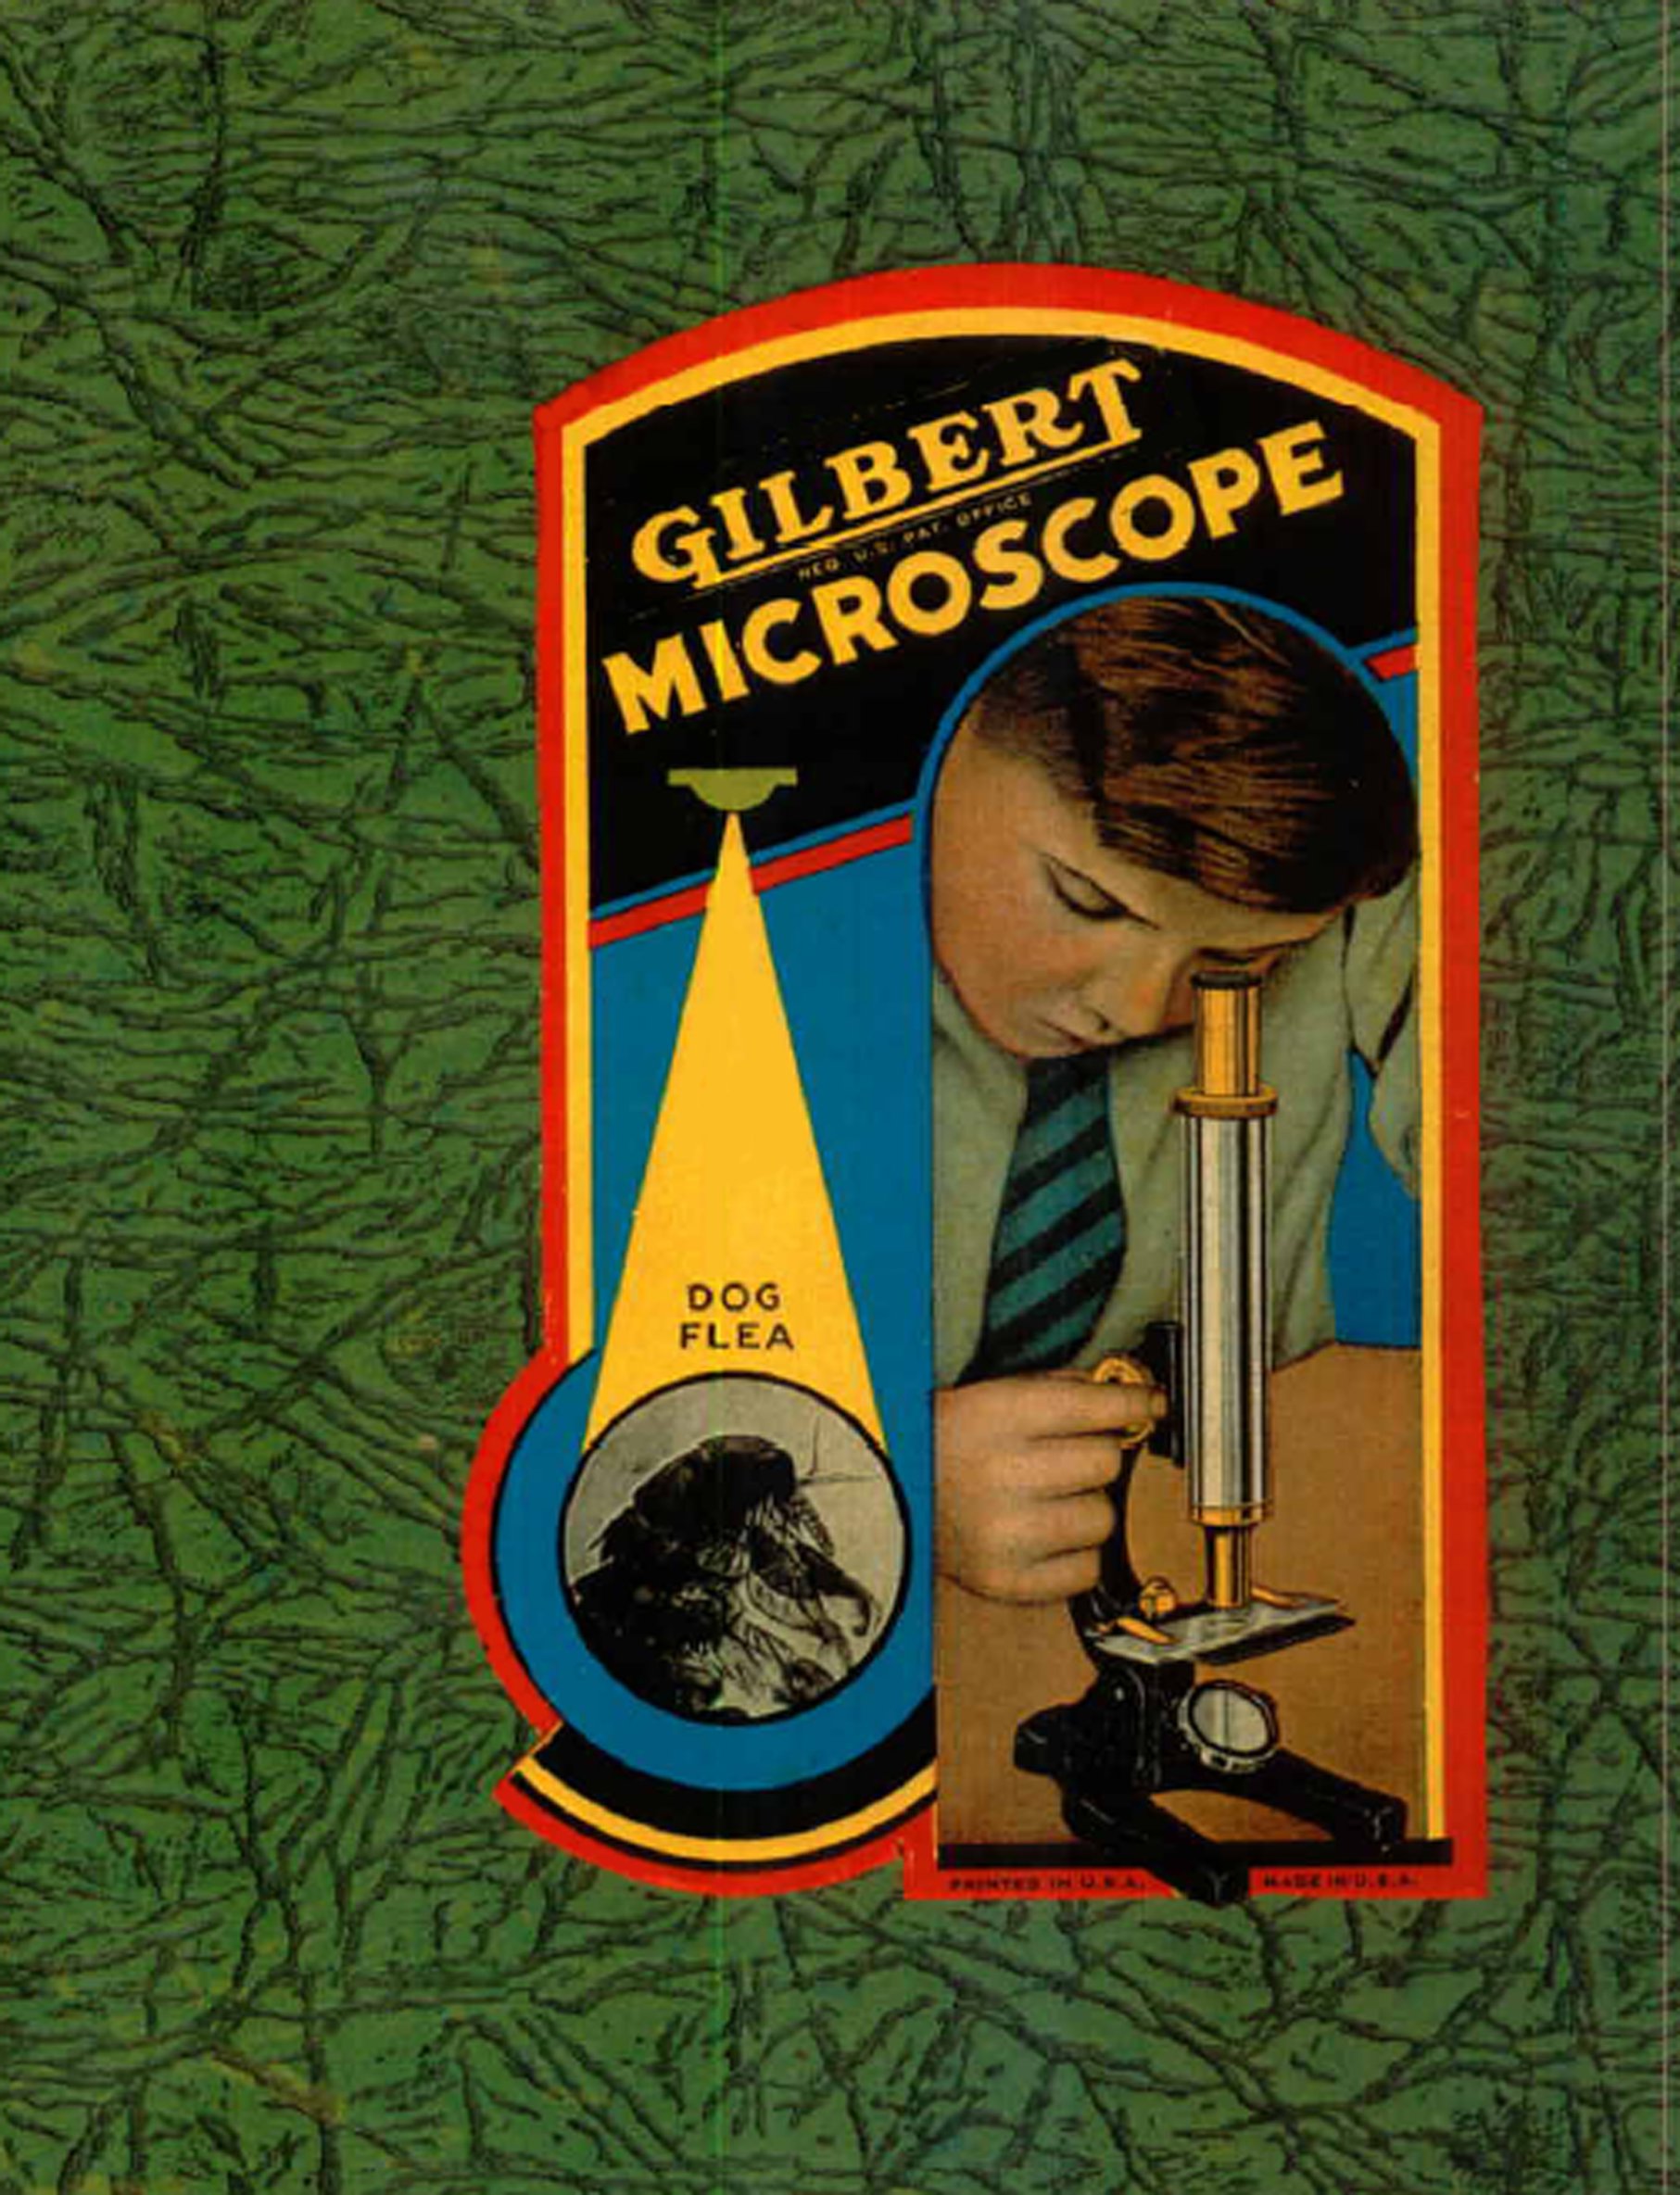
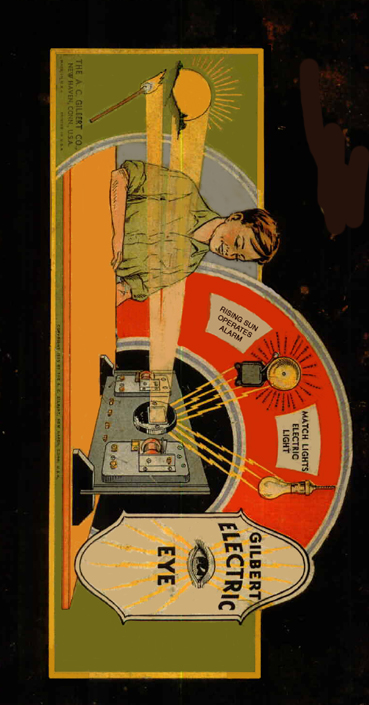
We have been busy with our scanner. You can download box labels for the Erector Set, Chemistry Set, Microscope Set and the astounding "Electric Eye Set".
Box Labels
We like the Electric Eye Label...
Go to the Free Downloads Section to get them!
Cardboard Inserts for Sets
I have two kinds of Erector sets -- the more-or-less careful restorations and the stuff that I actually use to make models. The original Erector sets are high on "curb appeal" but they are a disaster for model building since the various parts are not particularly accessible because they are pinned onto cardboard inserts. The first thing that kids did was to free the parts from the cardboard; this explains why the sets are a real mess when you get them. My "working" set has all the small parts in a tackle box with each type in an individual compartment. Tool boxes are used for the other parts with girders in one and base plates in another. This prevents the "Omigosh where did the P-73 get to..." moment.
One thing is clear - A.C. Gilbert was very concerned with the appearance of the toy when the child first saw it. He went to some length to patent the container for the Erector Set as well as the toy itself:
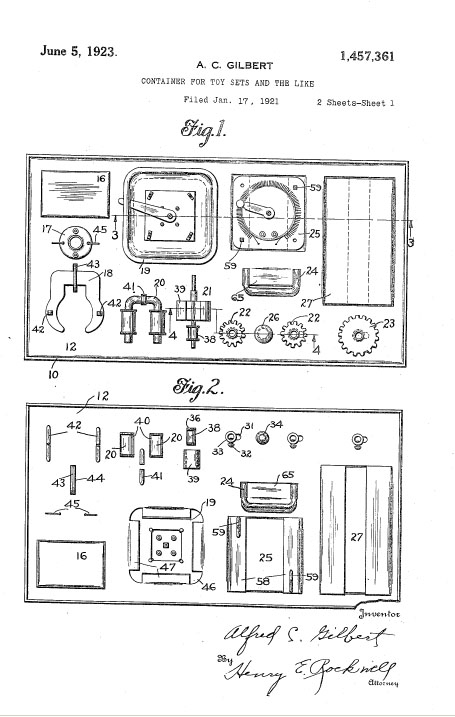

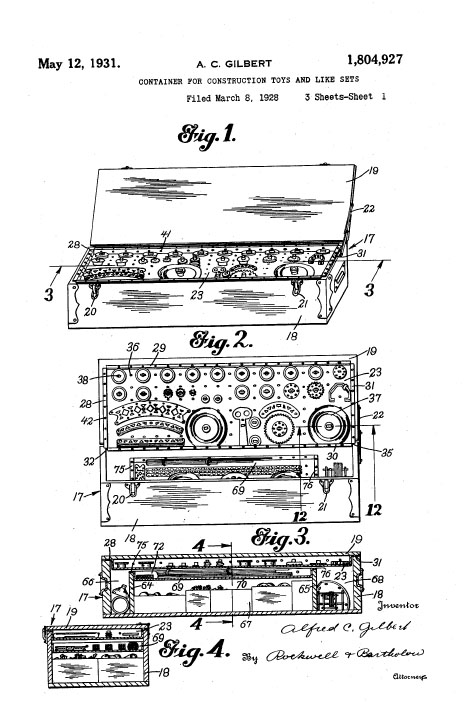
Patented Containers for the Erector Set
A.C. Gilbert Patent 1,457,361 for Erector Sets in Cardboard Boxes (pp 1-2)
A.C. Gilbert Patent 1,804,927 for Erector Sets in Metal cases
Click to enlarge
All of the elements of Gilbert packaging are in these two sets: the use of cardboard inserts to hold parts and storage of miscellaneous parts beneath the raised inserts. The artistic layout of parts is also clearly shown.
SO, if you want the glory of a restored set, you will have to acquire the cardboard inserts. You have two choices - you can buy them or you can make them
- If you have more money than time, you should think about buying the inserts. I bought several from a fellow named Mike. His address is MIKE_W513 [a*t] YAHOO [d*o*t] COM. I think that (a)you can figure that out and that (b) the the spam robots fail to decipher it. Mike is very knowledgeable, does good work and ships promptly. So, write to Mike and tell him what you need. A complete set of inserts for most sets was in the neighborhood of $25 in 2008. I have no idea of what inflation might be in the ensuing years. By the way, I have no relationship with Mike other than as a satisfied customer.
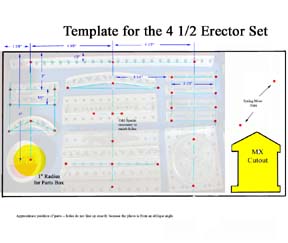
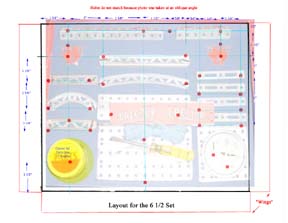
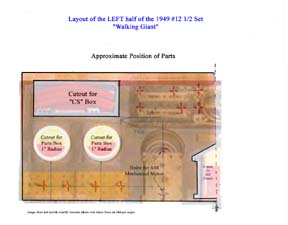
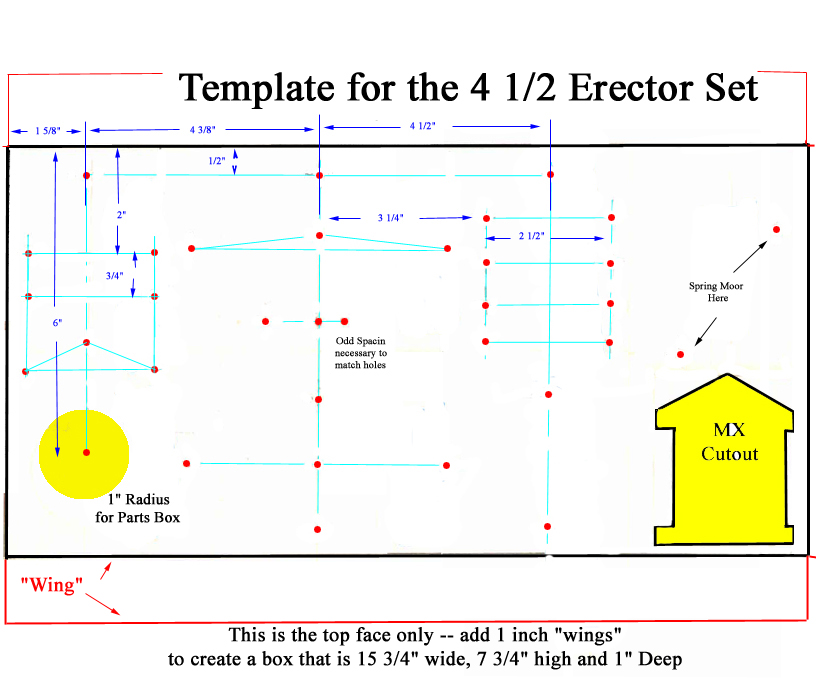
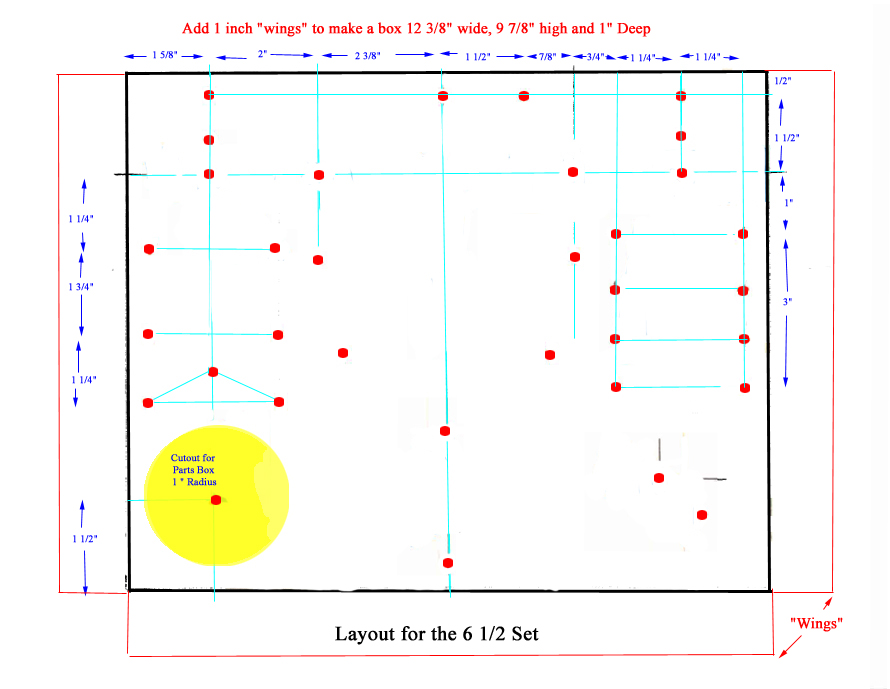
- If you have a lot of time, you should try making your own inserts. This takes a lot of patience and a steady hand with a sharp mat knife. If you are up to the challenge, you will find the templates for the 4 1/2, 6 1/2 and 12 1/2 sets in the Free Downloads Section. These patterns (that I created from scratch) will suffice, but are not the "official" A.C. Gilbert patterns.
Here is a tip on making inserts from Bruce, one of our readers:
"... I used to make inserts with matte board from Michael's (a nationsl craft store chain) but went to painted chipboard. There are a number of sources on the web, think one off the top of my is has Dick Blick in the name. In the printing industy chipboard is the cardboard they put on the back of notepads. I paint the inserts after all the trimming/punching is done with acrylic paint. Michael's sells a tan and a mustard yellow that when mixed together they are dead-on to the pre-WWII inserts. For the blue and green ones, I've taken inserts into the store and picked pretty close matching paint. For trimming the boxes, I use a thin colored paper from my kid's former elementary school. I had a good rapport with the staff and they let me "borrow" some. The school gets it in rolls 3' wide in various colors, they use it on bulletin boards to give some background color. What's really nice is the length is basically infinite. I can wrap a single piece of paper around a top tray for a 1949 #4 1/2 set (for example) without having to piece something together. ..."
Once again, please do not try to pass EITHER of these off as "originals".
Here are small photos of the templates that are available in the Free Downloads Section -- a photo of the layout of parts has been superimposed on them to give you an idea of how things are to be arranged :
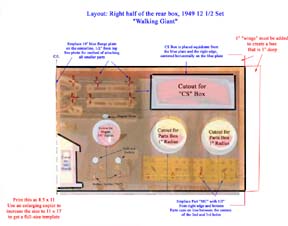
Templates for Cardboard Inserts
Here is a sequence of pictures that illustrates the basic principles of cutting out the various cardboard inserts.
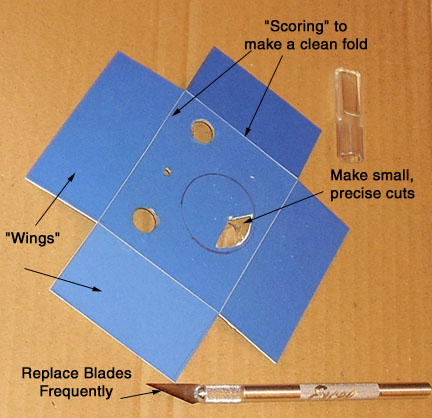
The Magnet Box
Folding the wings makes a box

Underside of the Magnet Box
Note that "scoring" means "cut halfway through"
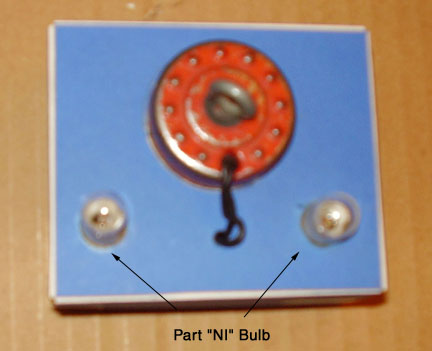
Finished magnet Box
The bulbs screw into the sockets
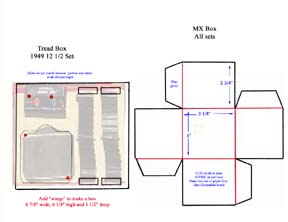
Here are some more simple inserts -- the "MX" Box and the "CS" box


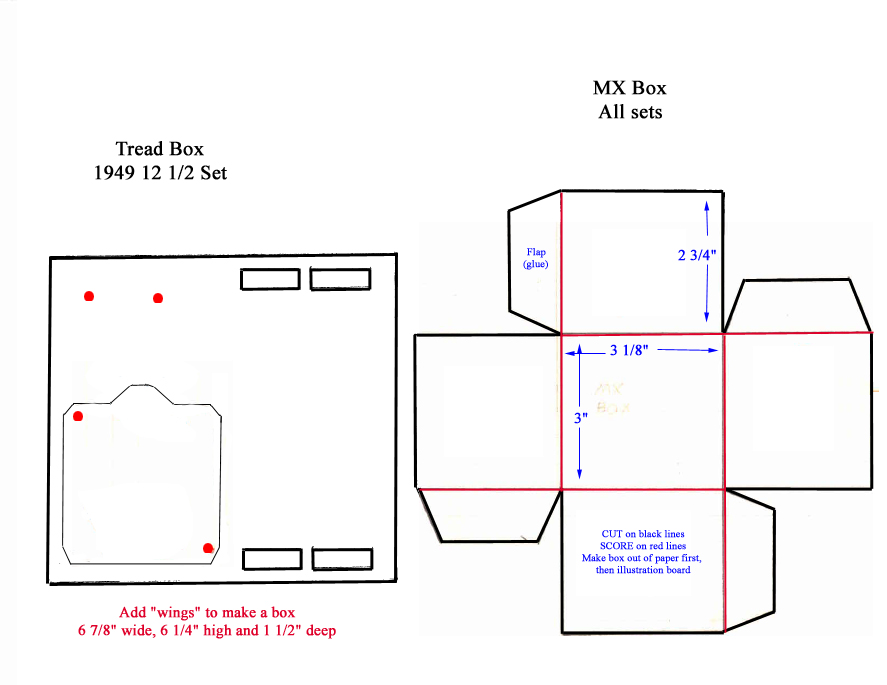
The box for Part "MX" -- the House or Control Shack
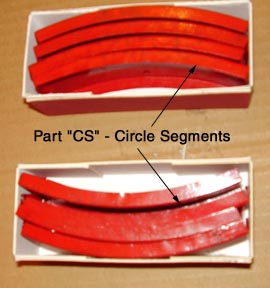
The Box for parts "CS" - Circle segments
All you have to do is take your time. Make a temporary paper pattern just to be sure that you understand how the thing folds and how the parts fit... .
Make a Paper Pattern and try it out before you go to the illustration board
Measure twice, cut once
For these inserts, I used a heavy illustration board, available from an artists' supply store.
NOTE: the templates are downloaded as an 8 x 10 ".jpg." Print them at 8x10 and then take that to an enlarging photocopier and copy at 11x17 -- this will give the full size pattern. Why? Few people have a printer that can handle 11x17 paper.
Miscellaneous Technical Notes
Correspondence with reader Murray W. has established that the pitch of the ladder chains (Part P-52) that are used in some post 1950s sets is 4 links to the inch. I hope that this information is useful to our readers who may be designing chain driven models.
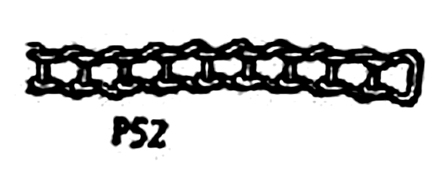
The Ladder Chain
Part P-52
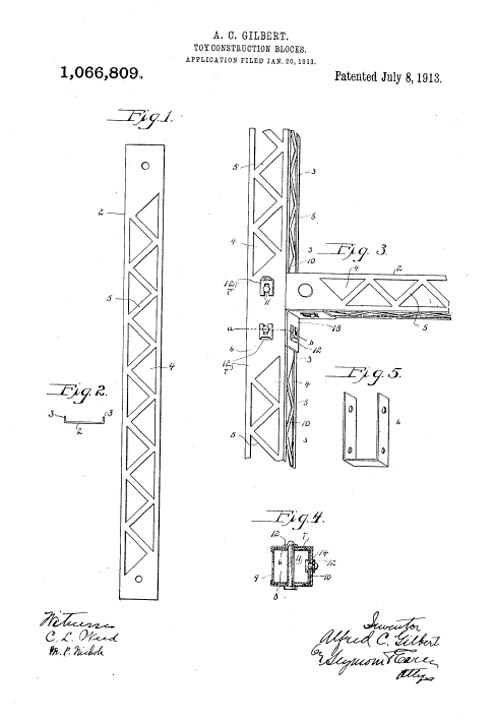
One of the dumbest things that I have seen on the Internet auctions is the guy who trys to sell "The Erector Set Patent" for about $10. The "original" patent, No. 1,066,809 (July 13, 1913) is shown below in a reduced form, but you can click on that image and a full sized page will come up. You can then print it and save $10. If you want a higher resolution image, you can use the techniques discussed on my Patent Information Page.
Patent for "Toy Construction Blocks"
Click Photo to Enlarge It
You can have as many patents as you might desire for free, here's another one:
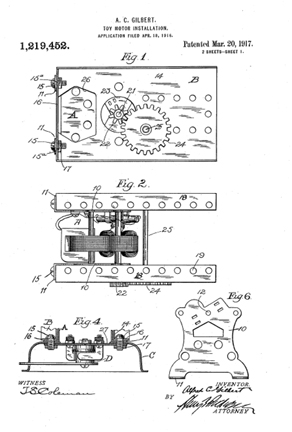
A.C. Gilbert's Motor Patent
Number 1,219,452
In order to get these, all you need is the Patent Number (below) and the techniques discussed on my Patent Information Page.
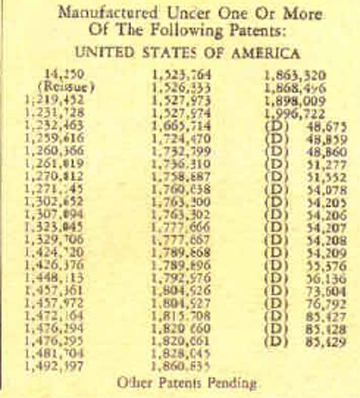
The Basic List of Patents
"(D)" Means "Design"
Any patent preceeded by (D) is a "Design Patent", or a registration of the appearance of an item. The rest are technical patents that focus on the workings of the item. Now you can have as many patents as you desire at only the cost of paper.
INSTRUCTIONS
Click on a hyperlink from the list below. The items are XLS, PDF or JPG files; some are quite large, so please consider file size before downloading. Occasionally, files held on the server may be corrupted-- if you find that this is the case with your download, please contact me and I'll send you the correct file.
- Gilbert Toy Catalogues
- The 1958 Catalogue
- The 1948 Catalogue featuring Superman!
- Science leads the Way Advertising Comic Book
- Adventures in Science Advertising Comic Book (Whole File), Easy-to-download parts below
- Adventures in Science Advertising Comic Book Part One
- Adventures in Science Advertising Comic Book Part Two
- Adventures in Science Advertising Comic Book Part Three
- Erector Set Downloads
- Template for the 4 1/2 Set (193 KB)
- Template for the 6 1/2 Set (187 KB)
- Template for the 12 1/2 Lower Box (Left Half) (289 KB)
- Template for the 12 1/2 Lower Box (Right Half) (354 KB)
- Template for the 12 1/2 Top Shelf (Left Half) (122 KB)
- Template for the 12 1/2 Top Shelf (Right Half) (97 KB)
- Template for the Tread Box and MX Box (128 KB)
- Part OF - Two Carousel Horses (896 KB)
- Part NU - Front and Back for 4 Parajumpers(667 KB)
- Eight Parts Can Labels (619 KB)
- Covering for the Constructioneer Parts Box (277 KB)
- Part AJ - The Erector Flag (64 KB)
- Kneeling Boy Outer Box Label (249 KB)
- Handy Tags for Your Sets (249 KB)
- The No. 7 1/2 "White Truck" Manual
- Part One (2.4 MB)
- Part Two (3.0 MB)
- Part Three (3.1 MB) (Includes Price List for 1928)
- The No. 8 1/2 Hudson Locomotive and Tender Manual
- The Skyscraper Panels
- Chemistry Set Items
- Box Label for the Chemistry Set (204 KB)
- Test Tube Labels for Chemistry Set (272 KB)
- Blank Chemistry Set Test Tube Label (15 KB)
- Blank Chemistry Set Envelope Label (71 KB)
- Gilbert Chemistry Manual for Kit No. 1 (1,440 KB)
- Complete Chemistry Manual (199 pp)
- Click here to download the Cover and Title Page
- Click here to download the Table of Contents (16 pages!)
- Click here to download Pages 24-41
- Click here to download Pages 42 - 61
- Click here to download Pages 62 -79
- Click here to download Pages 80-97
- Click here to download Pages 98-117
- Click here to download Pages 118-135
- Click here to download Pages 136-153
- Click here to download Pages 154-171
- Click here to download Pages 172-190
- Click here to download Pages 191-199
- Gilbert Chemical magic
- Click here to download Part One
- Click here to download Part Two
- Click here to download Part Three
- Click here to download Part Four
- Legacy Chemicals Brochure: a list of the 56 original (1936) Gilbert chemicals and their contemporary (2010) equivalent names.
- Chemcraft (not Gilbert) Manuals
- Porter ChemCraft Manual (c. 1955)
- Ideal-ViewMaster ChemCraft 400 Manual (c. 1987)
- Microscope Set Items
- Box label for Microscope Set (1684 KB)
- Test Tube Labels for Microscope Set (434 KB)
- Blank Microscope Set Test Tube Label (25 KB)
- Gilbert Microscope Manual
- Manual for the Microscope Set (pp 1-19) (2,670 KB)
- Manual for the Microscope Set (pp 20-37) (2,870 KB)
- Manual for the Microscope Set (pp 38-57) (3,803 KB)
- Manual for the Microscope Set (pp 58-77) (3,820 KB)
- Manual for the Microscope Set (pp 78-97) (3,112 KB)
- Manual for the Microscope Set (pp 98- 109) (1,570 KB)
- Dagwood Splits the Atom
- Click here to download pages 1-11 of this comic book (3.2MB)
- Click here to download pages 12-23 of this comic book (2.2 MB)
- Click here to download pages 24-36 of this comic book (2.5 MB)
- Manual for the Atomic Energy Set
- Click Here to download the Manual for Making Molecule Models
- Click Here to download a compendium of Science and Construction kit ads from the 1930s
- December 1936 Issue of Gilbert Thrills
- Part One (1.8 MB)
- Part Two (1.2 MB)
- Part Three (1.4 MB)
- Part One (1.1 MB)
- Part Five (1.8 MB)
- Gilbert Boy Engineering (128 pp)
- Part One pp 1-13 (1.9 MB)
- Part Two pp 14 - 33 (1.2 MB)
- Part Three pp 34 - 49 (1.0 MB)
- Part Four pp 50 - 65 (1.7 MB)
- Part Five pp 66 - 81 (2.1 MB)
- Part Six pp 82 - 97 (1.9 MB)
- Part Seven pp 98 - 113 (1.8 MB)
- Part eight pp 114 - 128 (2.2 MB)
- Gilbert Sound Experiments
- Click here to download Part 1
- Click here to download Part 2
- Click here to download Part 3
- Click here to download Part 4
- Click here to download Part 5
- Click here to download Part 6
- The Gilbert Weather Bureau (Boy Engineering Series)
- Part One (2.6 MB)
- Part Two (3.2 MB)
- Part Three (1.7 MB)
- Part Four (2.1 MB)
- Part Five (2.0 MB)
- Electric Eye Set
- Gilbert Mineralogy Handbook
- Click here to download Part One of the Mineralogy Book
- Click here to download Part Two of the Mineralogy Book
- Fun With Electricity
- The Glass Blowing Manual
- Glass Blowing Manual Pages 1-10
- Glass Blowing Manual Pages 11-20
- Glass Blowing Manual Pages 21-30
- Glass Blowing Manual Pages 31-40
- Glass Blowing Manual Pages 41-50
- Glass Blowing Manual Pages 51-60
- Glass Blowing Manual Pages 61-64
- Gilbert Hydraulics Volume from the "Boy Engineering" Series
- Gilbert Signal Engineering
- NOTE: This is 144 pages long DO NOT "OPEN" THE FILE -- Save it to your hard drive and read it without eating up bandwidth!
- Gilbert "Magnetic Fun and Facts"
- Gilbert "Boy Carpentry"
- Part One: Introduction, Types of Wood (pp 1-13)
- Part Two:Finishes, Chisels, Saws, Planes (pp 14-27)
- Part Three: Drills, Hammers, Fasteners, Joinery (pp 28-41)
- Part Four: Plans: Doll Bed, Bird House, Trellis, Automobile Cart, Checker Table, Foot Bench (pp 42-55)
- Part Five:Plans: Camp Stool, Magazine Rack, scooter, wheelbarrow (pp 56-69)
- Part Six:Marking Gauge, Armchair, Animal Trap, Workbench (pp 70-83)
- Part Seven:End Notes and Ads (pp 84-End)
- Mysto Magic Instruction Book
- Party Puzzles Instruction Book (1MB)
- The Handkerchief Tricks book
- The Knots and Splices book
- The Coin Tricks book
- Tin Can Toys - by Edward Thatcher
- This book is also available from Google Books and we are providing it free of charge
- Click here to download the whole 7.1 MB file
- PLEASE -- save it on your computer and don't try to open it from the website (conserve bandwidth!)
- Nov 18, 1946 LIFE Magazine Article about A.C. Gilbert (pp 20- 33) (893 KB)
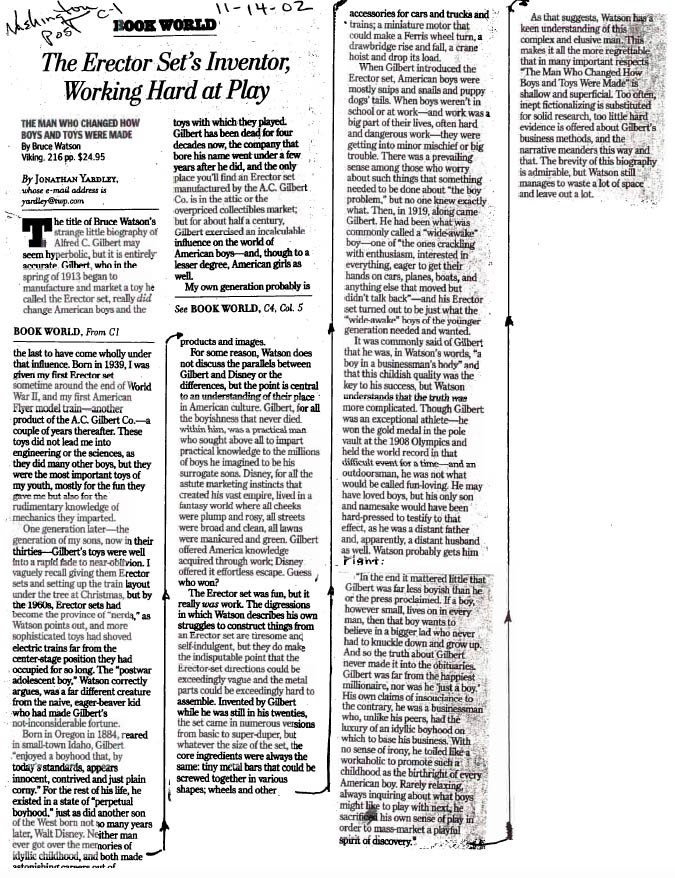
- Nov 14, 2002 Washington Post review of a Gilbert Biography (207 KB)
Click on a Box to Go There
Join Us on Facebook
Home | About Lindy | Last Week's Reviews | Upcoming Events | 1940s Collectibles
The Guide - Establishments - Travel - Accessories
Music | Links | Photo Gallery | Extras | Contact